Diablo 4 Whirlwind Barbarian – Lvl 70 Frost Cyclone Build Guide: In this Diablo 4 Barbarian Class Build, I’ll show you how to play a Lvl 70 – Whirlwind Barbarian, with the added twist that it also chills enemies. This build deals very high damage and allows you to quickly clear content as soon as you hit Tier IV. If you are looking for a build to both get you from the beginning of Tier IV up to the very late game, then this Diablo 4 Frost Whirlwind Build guide is for you!
Diablo 4 Ice Vortex Barbarian Build – Whirlwind
This whirlwind build has an insane clear speed, allowing you to deal with massive packs of elites in a matter of seconds, while also providing you with max speed at almost all times, which greatly reduces the time it takes to clear a Dungeon. The main difference with other Whirlwind builds is that we’ll be using the Penitent Greaves as a crowd control mechanic.
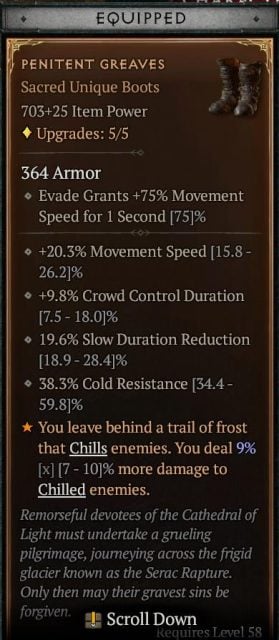
The Penitent Greaves leave a trail of frost that chills enemies when they stand on top of it, greatly reducing both their movement and attack speed. This allows to easily handle big packs of enemies and allows you to have a better control of the battlefield.

The build is very easy to set up, but has a wide variety of options to further improve it, making it perfect for both players that are just starting with Tier IV, and for players that are looking to quickly farm experience, Nightmare Dungeons or loot in general, as it allows you to clear content many levels above your current without breaking a sweat.
Diablo 4 Whirlwind Barbarian Build LvL 70+: Skill Distribution
Once you hit Tier IV you’ll want to start thinking about min/maxing to get the most out of your build, and that starts with skills. Thanks to Paragon Boards and to the increased equipment affixes, you’ll be able to bypass most of the restrictions you previously faced while leveling up, like running out of Fury or having to deal with cooldowns, so you’ll probably need to relocate some passives and even swap some skills.
If you’ve been using our Lvl 50 Vortex Barbarian you’ll need to swap a couple of passives, swap your Charge for Challenging Shout, and finally swap your Key Passive from Unconstrained into Unbridled Rage.

I won’t get too deep into skills, as you most probably know how they work by now. The only thing that you really need to understand is that shouts are what make this build work, as they provide you with Resource Generation, Damage Reduction and also boost your damage. Being able to reduce your shouts’ cooldown will be our top priority, as it dictates the amount of time you can maintain the build active.
Weapon Technique
For the weapon technique, we’ll take Two-Handed Axe Expertise, as we’ll be able to constantly maintain vulnerable on enemies.

Diablo 4 Ice Vortex Barbarian Build: Equipment, Gems and Aspects
Equipment is the most important part of any endgame build, and It’s important to understand that it’s a long term goal. You won’t have all paragon boards available right away, and getting all uniques will probably take a lot of farming, so try to use Legendary Aspects to adjust to your needs while you farm levels and better gear.
Legendary Aspects and Unique Powers
I’ll divide the equipment into different slots, so it’s easier to understand what you should be using and what affixes you should be looking for. Remember that unique equipment has fixed affixes and powers, so if you are using one, you might need to re-slot a Legendary Aspect into a different piece.
As a general note, try to prioritize Cooldown Reduction over other stats, as it directly affects your shouts and ultimate ability increasing your uptime.
Another important thing to notice is that, when looking for stats, you’ll want to make sure you are fulfilling your Paragon Rare Node requirements. Some rare nodes have very high requirements, and equipment is what allows you to fulfill them. These bonuses often double the rare node effect so, for example, getting an equipment piece with +100 Dexterity might unlock one or more node bonuses, giving you a massive bonus as a result.

Helmet
Legendary Aspect
Aspect of Grasping Whirlwind: This aspect is a must for this build, as it pulls enemies towards you, allowing you to deal with all of them at the same time, greatly increasing efficiency.
Affixes
- Cooldown Reduction
- Maximum Life
- + Stats
- + Damage While Berserking
- + Total Armor
Unique Equipment
Harlequin Crest : This is the most powerful helmet currently available in the game, and it has a very low chance to drop. In addition to its great affixes, it improves all your skills by 4 ranks, as well as providing you with damage reduction. If you are lucky enough to get it, make sure to equip it and slot the Grasping Whirlwind into something else.
Chest
Legendary Aspect
Aspect of the Protector: This provides you with a barrier when fighting Elites. The barrier not only provides you with damage mitigation, but it also boosts your attack thanks to Conceited Aspect. You will be able to remove this aspect once you get a hold of the Temerity unique pants.
Affixes
- + Damage
- + Damage to skills that swap to New Weapon (You can trigger this by swapping from Launging strike into Whirlwind. Just make sure to use a different arsenal weapon for Launging Strike)
- + Physical Damage
- + Rank to Challening Shout or Rallying Cry
- Damage Reduction from enemies that are bleeding
- + Total Armor
Unique Equipment
Rage of Harrogath: This armor is perfect for this build, providing both damage and damage reduction. The best part is its unique power, which provides a lucky hit chance to reduce the cooldown of your shouts when you inflict bleeding into enemies.
Gloves
Legendary Aspect
Aspect of Anemia: This aspect is great to help with crowd control, especially against big packs of elites. You’ll often stun a couple of them and prevent them from moving or attacking.
Affixes
- + Critical Strike Chance
- + Whirlwind
- + Stats
Unique Equipment
Gohr’s Devastating Grips: These gloves are by far the best gloves for this build, as they provide + rank to whirlwind, fury on kill and lucky hit, synergizing perfectly with the build. Its unique power creates an explosion at the end of the whirlwind, allowing you to finish off any remaining enemy.
Frostburn: If you want to keep the “freezing theme” you can add these gloves into the mix. Even if they don’t provide as much damage as the Gohr’s Devastating Grips, they still provide you with increased critical strike chance as well as a lucky hit chance to restore a percentage of your fury. Its unique power has a lucky hit chance to freeze enemies, which acts similar to Aspect of Anemia.
Waist
Legendary Aspect
Aspect of Numbing Wrath: This will allow you to generate enough fortify to enable the Counteroffensive passive. If you go for the Warbringer Paragon Board, you can take the legendary node to replace this.
Affixes
- + Damage after killing an elite
- + Total Armor
- + Rank of War Cry
- + Stats
- Damage Reduction
Unique Equipment
Temerity: These pants are amazing, providing you a ton of healing benefits. On top of that, its unique power allows you to convert any excess healing into a barrier. Since you’ll be healing all the time thanks to Raid Leader, you’ll be able to maintain a barrier all the time which at the same time provides you more damage thanks to Conceited Aspect.
Greaves
Legendary Aspect
Ghostwalker Aspect: This aspect greatly increases your movement speed while you are using Rallying Cry or Wrath of the Berserker. In addition, it will allow you to freely move through enemies, which is great to rush Dungeons ignoring regular mobs while looking out for elites.
Affixes
- + Movement Speed
- + Stats
Unique Equipment
Penitent Greaves: These greaves provide a massive boost to movement speed, allowing you to maintain max speed almost all the time thanks to Rallying Cry and Berskering. On top of that, its unique power leaves a trail of frost behind you, chilling enemies. Enemies that are chilled will move and attack slower, and if they stand on top of the chill for too long, they’ll freeze. On top of that, you’ll deal increased damage to chilled enemies, so this acts as a damage boost as well. These boots are amazing when used with Whirlwind, as you can pass through enemies and apply the debuff directly into them.
Two-Handed Bludgeoging
Legendary Aspect
Aspect of the Dire Whirlwind: This is a must for this build, increasing your critical strike chance the longer you use whirlwind.
Affixes
- + Damage to close enemies
- + Vulnerable Damage
- + Critical Strike Damage
- + Damage to Slowed Enemies
- + Damage to Bleeding Enemies
- + Core Skill Damage
- + Stats
Unique Equipment
You should use a regular weapon to make sure you are slotting the required two-handed aspect.
First One-handed
Legendary Aspect
Aspect of the Expectant: This aspect allows you to use Lunging strike to build up a buff that increases the damage of your next whirlwind. With a perfect roll of 10% you can achieve the maximum effect with 3 lunging strikes.
Affixes
- + Damage to close enemies
- + Vulnerable Damage
- + Critical Strike Damage
- + Damage to Slowed Enemies
- + Damage to Bleeding Enemies
- + Core Skill Damage
- + Stats
Unique Equipment
You should use a regular weapon to make sure you are slotting the required aspect
Second One-handed
Legendary Aspect
Conceited Aspect: This aspect increases all your damage while you have a barrier active. You’ll be able to achieve this by using the Aspect of the Protector at first, and then you’ll have it enabled all the time thanks to Temerity.
Affixes
- + Damage to close enemies
- + Vulnerable Damage
- + Critical Strike Damage
- + Damage to Slowed Enemies
- + Damage to Bleeding Enemies
- + Core Skill Damage
- + Stats
Unique Equipment
You should use a regular weapon to make sure you are slotting the required aspect
Two-Handed Slashing
Legendary Aspect
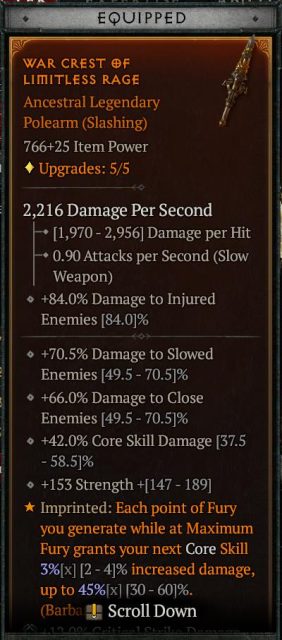
Aspect of Limitless Rage: This aspect allows you to capitalize on the excess fury that you generate to increase the damage of your whirlwind.
Affixes
- + Damage to close enemies
- + Vulnerable Damage
- + Critical Strike Damage
- + Damage to Slowed Enemies
- + Damage to Bleeding Enemies
- + Core Skill Damage
- + Stats
Unique Equipment
The Grandfather: This weapon has a very low chance to drop, but provides a massive boost to critical damage, which synergizes perfectly with this build. If you are lucky enough to get it, make sure to equip it.


Amulet
Edgemaster’s Aspect: This aspect increases the damage of your whirlwind based on the fury you had when you cast it, synergizing perfectly with the build.
Affixes
- Cooldown Reduction
- + % Damage
- + Damage with Two-Handed Slashing Weapons
- + Damage after killing an elite
- + % Stats
- + Total Armor
Unique Equipment
No unique equipment recommended for this category
First Ring
Legendary Aspect
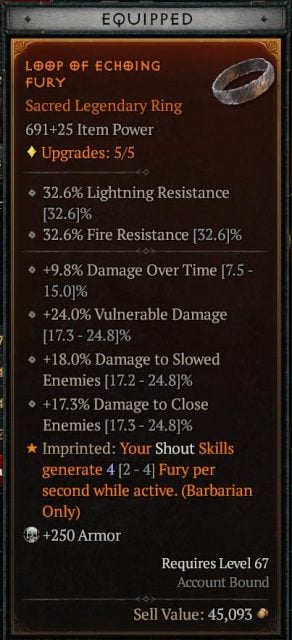
Aspect of Echoing Fury: This will provide you with fury while your shouts are active. The effect is cumulative, so when your 3 shouts are active you’ll get 3x the bonus.
Affixes
- + Damage to Slowed Enemies
- + Damage
- + Damage to Bleeding Enemies
- + Damage to Close Enemies
- + Critical Strike Chance
- + Vulnerable Damage
- + Physical Damage
- + Damage while Berserking
Unique Equipment
No unique equipment recommended for this category
Second Ring
Legendary Aspect
Bold Chieftain’s Aspect: This aspect is key to this build, as it greatly reduces the cooldown of your shouts. Make sure to save as many spares as possible, so you can slot it on rings if you need to swap them.
Affixes
- + Damage to Slowed Enemies
- + Damage
- + Damage to Bleeding Enemies
- + Damage to Close Enemies
- + Critical Strike Chance
- + Vulnerable Damage
- + Physical Damage
- + Damage while Berserking
Unique Equipment
No unique equipment recommended for this category
Gems
For gems, you’ll want to slot:
- Weapon: Emeralds to increase critical damage against vulnerable enemies.
- Armor: Rubies to boost your maximum life.
- Jewelry: Skulls to boost your defense value.

Paragon and Glyphs for Whirlwind Barbarian Build
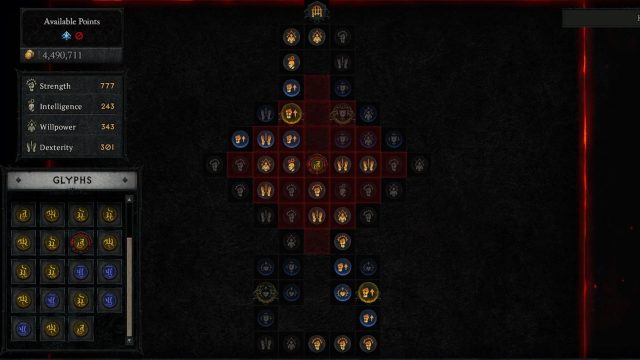
When it comes to Paragon boards, we are mainly going to aim for rare nodes that increase our damage output, as well as glyphs that synergize with our build. Please note that the order in which I get the nodes is just a general guideline, and you can adjust it to your current needs.
First Paragon Board – Base
On the first paragon board, you’ll want to make a zigzag, first taking the rare node on the right and then taking the one on the left (make sure to grab the physical damage magic nodes as well). On the glyph socket, you’ll want to slot the “Exploit“glyph and assign 25 dexterity around it. The normal effect will increase vulnerable damage, while the bonus effect will guarantee that we apply a 3-second vulnerable status as soon as you hit an enemy. This is extremely important to boost our damage from the beginning of the fight. You’ll still want to keep Pressure Point for longer fights and for bosses.

Second Paragon Board – Weapons Master
On this board you’ll want to rotate until you have the “Raw Power” rare node on the bottom side as this will be the first node you’ll want to take in combination with the physical damage magic nodes. Next, take the socket board and slot the “Marshal” glyph and assign 40 strength around it. This glyph is great for our build, making it so when using a shout, you reduce the cooldown of your other shouts. Since we have 3 shouts, this will act like a chain reaction, reducing the cooldown by 2.4 seconds.
From here you’ll want to head straight up and head for the “Brute” rare node. From here, turn left and follow the magical node and go down to get the “Hunter Killer” node, making sure to get all the +Damage to Elite magic nodes as well, which greatly increases the damage to elites.
Once you have these nodes, you can continue to the right from “Brute” and reach the board attachment gate.


Third Paragon Board – Decimator
You’ll want to rotate the board until you have the “Destroyer” rare node on the left side. Head straight for it and take it in combination with all its magic nodes. From there, head upwards, where you’ll be able to get another “Brawn” rare node and a couple of physical damage magic nodes.
From here, head towards the center and grasp the socket. Here you’ll want to slot the “Disembowel” glyph and assign 5 willpower around it. This is our most important glyph because of its bonus effect, which gives you a chance to reduce your shouts’ cooldowns when you kill a bleeding enemy.
Once you have the socket and bonus effect, you’ll want to take the “Demolish” rare node, which is straight on top of the socket. Make sure to take the Vulnerable Damage rare nodes as well.
Once you have all the previous nodes, you’ll want to take the Board attachment located at the top. To do so, continue from the “Brawn” rare node.


Fourth Paragon Board – Carnage
Rotate the board until the “Berserker” rare node is on the bottom. Go straight for it and take the magic nodes as well. From here, head straight up and turn right on the “Fierce” rare node. Take the node in combination with the Damage while Berserking magic nodes.
Now you’ll want to take the socket. Here you can slot the glyph of the weapon that you are using to further boost your damage
Once you have all nodes, take the attachment gate on the left.

Fifth Paragon Board – Warbringer
Rotate the board until you get the “Guarded Advance” node on the right part. Make your way towards the center, grabbing all the Damage while fortified magic nodes as well as the Guarded Advance node. Once in the center, take the Legendary Node. This will allow you to free the Aspect of Numbing Wrath from your waist. If you get Temerity very soon during your playthorugh you might want to prioritize this board before the others.
Final Tips
Remember that to maximize damage, you’ll need to build up both Aspect of Limitless Rage and Aspect of the Expectant. To do so, simply use a couple of lunging strikes and keep an eye on top of your skill bar, where you’ll see both buffs. Once the number are at max, you’ll be able to cast whirlwind at its full power.
When using shouts, make sure to hit as many enemies as possible to further reduce their cooldown. If you are using Rallying Cry to navigate the dungeon, use War Cry and Challenging Shout as well, as the paragon glyph will help with cooldowns.
I highly recommend that you spend your Obols on rings, since this will allow you to get good versions of both Aspect of Echoing Fury and Bold Chieftain’s Aspect
Remember to craft and drink Precision Elixirs, which increases both critical strike chance and critical strike damage, further boosting the build performance.
This build is designed to fight multiple enemies at once, so try to run dungeons with tight corridors and big packs.

Be sure to check out our Diablo 4 Wiki for any other questions you have about the game and the Builds page if you are looking for more Diablo IV Builds, as well as our Getting Started Guide and Best Class to Play if you are looking for more Diablo 4 content!
1 response to “Diablo 4 Lvl 70 Whirlwind Build – Barbarian Ice Vortex”
Awesome guide but Aspect of Limitless Rage (one of the main DPS boosts) is currently disabled as of the time of publishing this. Hopefully they fix it soon.
Log in to leave a Comment