Baldur’s Gate 3 Druid Class Guide – In this Baldur’s Gate 3 Druid Class Guide, I’m going to be covering the Druid Class, including all 3 Subclasses, and providing you some useful information. I’ll be doing more Build Guides for Baldur’s Gate 3, but for now, let’s just look at how a Druid functions and its basics.
Baldur’s Gate 3 Druid Class Guide
Druids in BG3 are spellcasters that are in tune with animals and their environment. Able to cast a wide assortment of spells, many of which are linked to the elements or nature, they also have more Armour and Weapon Proficiencies than all other full spellcasters save for Clerics.
Druids often provide support and utility to their group via Spells like Healing Word, Guidance, Cure Wounds, Enhance Ability, and Pass Without a Trace. However, they also have offensive spells like Thunderwave, Moonbeam, Call Lightning and Ice Storm that can deal solid damage as well.
Druids use Wisdom to cast their Spells, just like Clerics and Rangers, and they must Prepare their Spells in order to cast them. This allows Druids to know more Spells than some full spellcasters, but they will not be able to cast all of them at once.

Druids can also use Wild Shape to change into different creatures, gaining the HP, Armour Class (AC), STR, DEX, CON and Features of those animals. They will remain in that form until they shift back or until they run out of HP. Circle of the Moon Druids focus on this aspect specifically.
BG3 Druid Character Creation
In this section, we’ll take a look at how to set up your Druid during Character Creation for the best results. We’ll begin with Abilities first, since this is arguably the most important part, aside from choosing your Subclass.
Abilities
Your primary Ability as a Druid is Wisdom.
- Wisdom determines how difficult it is for enemies to Save against your Spells, improves Spell Attack Rolls, improves Wisdom Skill Checks and Wisdom Saving Throws, as well as increases the amount of Prepared spells a Druid can have.
- Constitution is there to help keep you alive via HP, and also to help you maintain Concentration on spells like Fog Cloud, Moonbeam, or Spike Growth, should you get hit while Concentrating on them.
For this reason, I strongly recommend that you invest 16 in WIS and 14 in CON during Character Creation. 14 DEX is also not bad to improve your Initiative, which helps you to take your turn sooner in combat, as well as provide some Armour Class. However, if you plan to be in Wild Shape form in combat most of the time, you might want to dump your STR, DEX and CON, since these will be replaced by the Abilities of the Shape you turn into.
Normal Druid
- STR: 10
- DEX: 14
- CON: 16
- INT: 10
- WIS: 16
- CHA: 10
Wild Shape Druid
- STR 10
- DEX 12
- CON 10
- INT 14
- WIS 16
- CHA 14
Note I’ve changed this from the recommendations as it more optimizes your Character during the early goings of the game.
Race
Elf is not bad for some Weapon Proficiencies, and Perception Proficiency, and Fey Ancestry. They also gain Darkvision, which can help land your attacks in dark places, and Wood Elves also gain Stealth Proficiency and increased Movement Speed.
Human is also not bad if you want a couple more Weapon Proficiencies and another Skill Proficiency.
Lightfoot Halflings are another solid choice, because they reroll if they roll a 1 on any Attack Roll, Ability Check or Saving Throw, all but preventing them from ever Critically Missing. They also cannot be Frightened easily and they have Advantage on Stealth Checks.
Drow have Superior Darkvision, Fey Ancestry and Perception Proficiency, which are all decent pick ups for the Druid.
Half-Orc is also a good choice, especially for Circle of the Moon Druids, since they have Darkvision, Relentless Endurance, and Savage Attacks.
Skills
For Skills you’ll likely focus on Wisdom based Skills since that’s where you’ll have a good amount of Ability Points. If you take the Folk Hero Background, and are an Elf or Drow, you can select Insight and Medicine and have Proficiency in all Wisdom Skills.
Baldur’s Gate 3 Druid Guide – Level 1
Druid Level 1 Spells & Cantrips
Al level 1, Druids gain Level 1 Spells along with two Level 1 Spell Slots and 2 Cantrips, including Shillelagh which can be used to make their melee attacks with certain weapons use Wisdom for their Attack and Damage rolls.
Note that Druids need to prepare their Spells, and can cast any Spell they know as long as they have the Spell Slot for it and it’s Prepared.
Druid Spell Slot Progression
| Druid Level | Lvl 1 Slots | Lvl 2 Slots | Lvl 3 Slots | Lvl 4 Slots | Lvl 5 Slots | Lvl 6 Slots |
| Lvl 1 | 2 | – | – | – | – | – |
| Lvl 2 | 3 | – | – | – | – | – |
| Lvl 3 | 4 | 2 | – | – | – | – |
| Lvl 4 | 4 | 3 | – | – | – | – |
| Lvl 5 | 4 | 3 | 2 | – | – | – |
| Lvl 6 | 4 | 3 | 3 | – | – | – |
| Lvl 7 | 4 | 3 | 3 | 1 | – | – |
| Lvl 8 | 4 | 3 | 3 | 2 | – | – |
| Lvl 9 | 4 | 3 | 3 | 3 | 1 | – |
| Lvl 10 | 4 | 3 | 3 | 3 | 2 | – |
| Lvl 11 | 4 | 3 | 3 | 3 | 2 | 1 |
| Lvl 12 | 4 | 3 | 3 | 3 | 2 | 1 |
BG3 Druid Guide – Level 2
Subclass Selection
At level 2, Druids will select a Subclass and gain the Subclass Features of it. We’ll discuss what these are in the Subclasses Section, but for now lets continue with things all Druids get.
Also at this level, all Druids will gain Wild Shape, allowing them to transform into one of 4 animals as an Action twice every Short Rest. While transformed they will take on the appearance of the animal, have its HP and AC, and have the attacks and features of it. They will also have the STR, DEX and CON of said animal, though their INT, WIS and CHA will remain the same as their character.
Each Wild Shape has a base HP that increases every 2 levels of the Druid, and the damage of each Wild Shape is increased at levels 4, 8 and 12. If their HP is reduced to zero while in their Wild Shape, they will revert back to their normal form, with whatever HP they had before shifting.

Note that while in Wild Shape, Druids cannot cast Spells or use other Class Features except those that specifically effect Wild Shape.
BG3 Druid Guide – Level 3
Druid Level 2 Spells
At Level 3, Druids gain access to Level 2 Spells and gain Level 2 Spell Slots, and can upcast Level 1 Spells with these Slots if they can be. Many spells in BG3 can be upcast for additional damage, or increased targets. Pay attention to which spells they are, so you don’t waste higher-level Spell Slots on ones that can’t be.
BG3 Druid Guide – Level 4
At level 4, all Druids gain Wild Shape: Deep Rothé, allowing them to shape shift into this form when using Wild Shape if they wish.

Feat
Also at this level, Druids will gain their first Feat. Ability Improvement is a good choice for more Wisdom, but there are other options as well. Such as: Lucky, for controlling outcomes better or Resilient Constitution if you find yourself casting a lot of spells that require Concentration, as this will allow you to add your Proficiency Bonus to your Concentration Saving Throws when you get hit in combat.
BG3 Druid Guide – Level 5
At level 5, Druids gain Wild Strike allowing them to make a second attack in combat while in Wild Shape if they made an Unarmed Attack. This allows them to be on par with most martial classes in terms of number of Attacks, as long as they remain in Wild Shape form.
Druid Level 3 Spell Slots & Spells
Also at this level, Druids gain access to Level 3 Spells and gain Level 3 Spell Slots, and can upcast Level 1 & 2 Spells with these Slots if they can be.
BG3 Druid Guide – Level 6
Wild Shape: Owlbear and Wild Shape: Panther
At level 6, Druids gain Wild Shape: Owlbear and Wild Shape: Panther, allowing them to use their Wild Shape to transform into these creature types.
BG3 Druid Guide – Level 7
Druid Level 4 Spell Slots & Spells
At Level 7, Druids gain access to Level 4 Spells and gain Level 4 Spell Slots, and can upcast Level 1, 2, & 3 Spells with these Slots if they can be.
BG3 Druid Guide – Level 8
Feat
At level 8, all Druids gain their second Feat. They can go with Ability Improvement for more Wisdom, or go with any of the other Feats I mentioned. Elemental Adept is also not a bad choice if you are a Circle of Land Druid and find a damage type you gravitate towards.
BG3 Druid Guide – Level 9
Druid Level 5 Spell Slots & Spells
At Level 9, Druids gain access to Level 5 Spells and gain Level 5 Spell Slots, and can upcast Level 1, 2, 3, & 4 Spells with these Slots if they can be.
BG3 Druid Guide – Level 10
At level 10, Druids gain Improved Wild Strike, allowing them to make 2 additional attacks after making an Unarmed Attack while in Wild Shape. This is incredibly strong.
Also at this level, all Druids can use their Wild Shape to turn into a Dilophosaurus if they wish.
BG3 Druid Guide – Level 11
Druid Level 6 Spell Slots & Spells
At Level 11, Druids gain access to Level 6 Spells and gain 1 Level 6 Spell Slot, and can upcast Level 1, 2, 3, 4 & 5 Spells with this Slot if they can be. This is the highest Level of Spells Druids can learn in BG3.
BG3 Druid Guide – Level 12
Feat
At level 12, Druids gain their final Feat, and can choose from any of the ones I suggested, though it would be ideal to max out Wisdom here if they have not already.
BG3 Druid Guide – Equipment
Druids in BG3 can use Light and Medium Armour, as well as Shields and a small selection of Weapons. Each Druid will likely be outfitted a bit differently depending on how much Wild Shaping they plan to do, what Race they chose during Character Creation, and if they Multiclassed or not.
However, most Druids will likely wear Medium Armour, since they won’t have a ton of points invested in Dexterity, providing them the most protection possible. The will also likely use a Shield to further boost their Armour Class when not in Wild Shape.
They will generally use a Staff or Club for their weapon since they can cast Shillelagh on these two weapon types, allowing them to use their Wisdom for their Attack and Damage Rolls. They might use a ranged weapon as well, in a pinch, since they have some Dexterity.
Baldur’s Gate 3 Druid Guide – Subclasses
Choosing a Druid Subclass comes down to how much you want to use Wild Shape in combat. If it’s a lot, then Circle of the Moon is the way to go. If you’d rather remain in your normal form, and don’t really want to use Wild Shape that much and want to raise an army to fight for you instead, then Circle of the Spores is the better choice. If you want to use Wild Shape sometimes, and want a few more choice Spells to cast, then Circle of the Land is the way to go.

| Subclass | Land | Moon | Spores |
| Level 2 | Natural Recovery Choose Cantrip | Combat Wild Shape Lunar Mend Wild Shape: Bear | Halo of Spores Symbiotic Entity Bone Chill (Cantrip) |
| Level 3 | Circle of the Land 2 Spells | — | Blindness (Spell) Detect Thoughts (Spell) |
| Level 4 | — | Wild Shape: Dire Raven | — |
| Level 5 | Circle of the Land 2 Spells | — | Animate Dead (Spell) Gaseous Form (Spell) |
| Level 6 | Land’s Stride: Difficult Terrain | Primal Strike | Fungal Infestation |
| Level 7 | Circle of the Land 2 Spells | — | Blight (Spell) Confusion (Spell) |
| Level 8 | — | Wild Shape: Sabre-Tooth Tiger | — |
| Level 9 | Circle of the Land 2 Spells | — | Cloudkill (Spell) Contagion (Spell) |
| Level 10 | Nature’s Ward | Wild Shape: Water Myrmidon Wild Shape: Fire Myrmidon Wild Shape: Earth Myrmidon Wild Shape: Air Myrmidon | Spreading Spores |

Baldur’s Gate 3 Druid Guide – Circle of the Land
At level 2, Circle of the Land Druids gain Natural Recovery Charges, allowing them to regain Spell Slots back as an Action. Each Spell Slot costs 1 charge per Spell Slot level, meaning Level 1 Spell Slots cost 1 Charge, 2 Spell Slots cost 2, and so on.
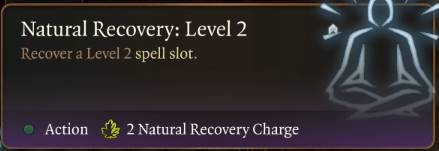
Druids will gain another Natural Recovery Charge at each odd Druid level, capping out at 6 Natural Recovery Charges at Druid level 11. Note that the highest level Druid Spell Slot recoverable is 5, and once you’ve run out of Charges you must Long Rest to get them back.
Extra Cantrip
Also at this level, Circle of the Land Druids gain an extra Cantrip that other Druid Subclasses do not gain.
At level 3, Circle of the Land Druids will choose 2 Spells that are always Prepared based on the region of their choice. Note that these are level 2 Spells, and they can choose a different region each time they can select Spells, and they are not stuck to one region.

Circle of the Land Spells
At level 5, Circle of the Land Druids will once again choose 2 Spells that are always Prepared based on the region of their choice. Note these are level 3 Spells.
Land’s Stride: Difficult Terrain
At level 6, Circle of the Land Druids are no longer slowed down by Difficult Terrain and their Movement Speed is no longer cut in half when moving through it.
Circle of the Land Spells
At level 7, Circle of the Land Druids will once again choose 2 Spells that are always Prepared based on the region of their choice. Note these are level 4 Spells.
Circle of the Land Spells
At level 9, Circle of the Land Druids will choose their last 2 Spells that are always Prepared based on the region of their choice. Note these are level 5 Spells.
At level 10, Circle of the Land Druids gain Nature’s Ward, making it impossible for Elementals or Fey to Charm or Frighten them, as well as making them immune to being Poisoned or Diseased.
Baldur’s Gate 3 Druid Guide – Circle of the Moon
At level 2, Circle of the Moon Druids gain access to Combat Wild Shape, which allows you to use Wild Shape as a Bonus Action, instead of an Action. This means Circle of the Moon Druids can shift and Attack in the same turn, giving them a leg up over Circle of the Land Druids when it comes to Wild Shape.
Also at this level, Circle of the Moon Druids gain Lunar Mend, allowing them to heal themselves while in Wild Shape by using a Spell Slot as a Bonus Action. They gain 1D8 healing per level of Spell Slot used, and since it’s a Bonus Action they can still Attack on the same turn.

And finally at this level, Circle of the Moon Druids gain access to Wild Shape: Bear, allowing them to transform into a Bear with their Wild Shape Feature.
At level 4, Circle of the Moon Druids can use their Wild Shape to turn into a Dire Raven. This allows them to Blind enemies, and also Fly to higher or lower elevations easily, which is particularly useful outside of combat when exploring.
At level 6, Circle of the Moon Druids gain Primal Strike. This makes Attacks made in Wild Shape count as magical for the purposes of overcoming Resistances and Immunities to non-magical damage. This will keep their damage high, even against enemies they might normally struggle to deal damage to.
At level 8, Circle of the Moon Druids can Wild Shape into Sabre-Tooth Tigers. These animals can jump further, and heal every turn in combat naturally, making them formidable creatures to deal with.
Wild Shape: Water Myrmidon, Wild Shape: Fire Myrmidon, Wild Shape: Earth Myrmidon, Wild Shape: Air Myrmidon
And finally at level 10, Circle of the Moon Druids can Wild Shape into a Myrmidon of Fire, Water, Earth or Air, each with their own Features etc. These are especially deadly forms, and should be considered by any Circle of the Moon Druid who is of this level.
Baldur’s Gate 3 Druid Guide – Circle of the Spores
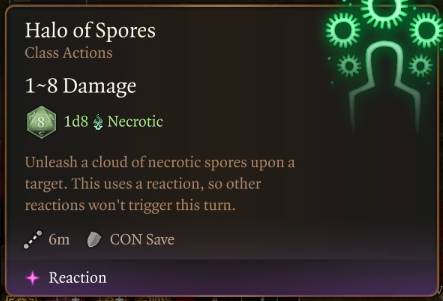
At level 2, Circle of the Spores Druids can cast Halo of Spores dealing Necrotic Damage to a target that is 6m away or less. This targets the CON of the creature, and uses the Wisdom of the Druid for its Spell DC. This is cast as a Reaction, meaning it does not use a Bonus Action or Action.
Halo of Spores will increase to 1D6 damage at level 6 of Druid and 1D8 damage at level 10 of Druid. Additionally, while Symbiotic Entity is active, it will deal double damage.
Also at this level, Circle of the Spores Druids can use a Wild Shape Charge and a Action to give themselves temporary hit points equal to 4 per Druid level, and to make it so Melee Attacks and unarmed Attacks deal 1-6 Necrotic Damage as long as the temporary hit points last. Note that currently this also works with Ranged Weapon Attacks, but it’s unclear if this is intended.
Additionally, as mentioned it doubles the damage of Halo of Spores while it remains active. And it remains active until Long Rest or until all temporary hit points are gone. Note that if you use Wild Shape, it will cancel Symbiotic Entity early, so you cannot use both of these at the same time.
And finally at this level, Circle of the Spores Druids gain the Bone Chill Cantrip as well, which Druids would not normally gain.
At level 3, Circle of the Spores Druids gain the Blindness and Detect Thoughts Spells that are always Prepared.
At level 5, Circle of the Spores Druids gain the Animate Dead and Gaseous Form Spells that are always Prepared.
At level 6, Circle of the Spores Druids gain 4 Fungal Infestation Charges that they can use to create Fungal Zombies from corpses as a Reaction. These Zombies operate much like regular Zombies raised with the Animate Dead Spell, but you can have up to 4 of them out at one time. Fungal Infestation Charges replenish on Long Rest.
At level 7, Circle of the Spores Druids gain the Blight and Confusion Spells that are always Prepared.
At level 9, Circle of the Spores Druids gain the Cloudkill and Contagion Spells that are always Prepared.
At level 10, Circle of the Spores Druids can cast Spreading Spores as a Bonus Action if they have Symbiotic Entity active. This does Necrotic Damage in an AoE each turn as long as Symbiotic Entity is active, and can be recast as a Bonus Action.

Baldur’s Gate 3 Druid Guide – Multiclassing
In this section of our Baldur’s Gate 3 Druid Class Guide we’ll take a look at Multiclassing a Druid in BG3, and what other Classes you might Multiclass with. Keep in mind this is not a complete list, but rather helpful suggestions to that make good pairings.
When To Multiclass
Druids can be a challenging Class to Multiclass for several reasons. First, their Wild Shape form gets stronger at even levels, making it unlikely someone would dip into Druid for this Feature, since it would fall off as the game gets harder and enemies increase in level.
Second, they gain higher level Spells at every odd level. If you want higher level Druid Spells, then you must continue to take levels in Druid.
Third, each Subclass gains different things at different levels, making it hard to uniformly say “Multiclass Druid at these levels”. For this reason it’s best to explore each Subclass individually when Multiclassing.
Multiclassing Circle of the Land
I like 5 levels of Hunter or Gloom Stalker Ranger with 7 levels of Circle of the Land Druid. This gives you the Extra Attack of the Ranger, and some Weapon Proficiencies, and either Dread Ambusher or Colossus Slayer or Horde Breaker. And it still gives you level 4 Druid Spells, with ability to gain back some Spell Slots via Natural Recovery, and 6 of Circle of the Land Spells. Rangers and Druids both use Wisdom to cast their Spells, so their is a nice synergy here.
I also like 3 Way of the Four Elements and 9 levels of Circle of the Land Druid. This gives you level 5 Druid Spells, and 8 Circle of the Land Spells on the Druid side. On the Monk side you gain Martial Arts, Patient Defence and Step of the Wind, Deflect Missiles and you can add your Wisdom to your AC if Unarmoured. This also lets you cast some Monk Spells with your Ki if you want, and these use your Wisdom for their Spell DC and Spell Attack Rolls, which synergizes nicely.
Multiclassing Circle of the Moon
I actually don’t recommend Multiclassing a Circle of the Moon Druid for a few reasons. First, Druids’ Wild Shape form gains HP or damage every 2 levels, so the more levels in Circle of the Moon Druid they take the better their Wild Shape forms will perform.
Second, you will want at least 10 levels of Circle of the Moon Druid in order to gain Improved Wild Strike, allowing 3 attacks per round. This only leaves 2 levels of another Class.
Circle of the Moon Druid
| Level | Wild Shape Improvement | New Shape |
| Level 2 | HP Increase | Bear |
| Level 4 | HP Increase, Damage Increase | Deep Rothé, Dire Raven |
| Level 5 | Wild Strike (Extra Attack) | — |
| Level 6 | HP Increase, Primal Strike | Owlbear, Panther |
| Level 8 | HP Increase, Damage Increase | Sabre-Toothed Tiger |
| Level 10 | HP Increase, Improved Wild Strike | Dilophosaurus, Myrmidon (Air, Fire, Water, Earth) |
| Level 12 | HP Increase, Damage Increase | — |
And third, most Class Features do not impact your character while in Wild Shape. For instance, you cannot use Action Surge if you took 2 levels of Fighter. You cannot use Divine Smite if you took 2 levels of Paladin. Monks do add Unarmoured Defence and Unarmoured Movement, but you cannot use Flurry of Blows or Unarmed Attack while in Wild Shape. Is that worth trading a 3rd Feat and increased damage and HP at level 12 of Circle of the Moon? I don’t think it does.
In short, Multiclassing a Circle of the Moon Druid is a lot like Multiclassing a Beast Master Ranger, and the more you Multiclass it the more the Features of the Subclass really drop off the further into the game you go.
Multiclassing Circle of the Spores
I like 6 levels of Way of the Open Hand Monk and 6 levels of Circle of the Spores Druid. This gives you Extra Attack, Stunning Strike, a good amount of Ki to use Flurry of Blows with, and also increased damage from Manifestation of Mind, Body and Soul when making Unarmed Attacks. You also gain Armour Class from Wisdom if Unarmoured. You also gain Ki-Empowered Strikes.
From Druid you gain Symbiotic Entity giving you temporary HP to protect yourself, and you also add Necrotic Damage to your melee and Unarmed Attacks. Remember that Flurry of Blows hits twice, so you gain extra damage on each hit, which is also true for Manifestation of Mind, Body and Soul. You can also cast Halo of Spores at 1D6 at this level, so its damage does improve, and you can still use Fungal Infestation as well.
I hope you found these tips helpful, and we’ll have some more Builds out really soon that showoff more of these Multiclassing aspects!
That wraps up our Baldur’s Gate 3 Druid Class Guide! Stay tuned for more Baldur’s Gate 3 content as we update the other Builds, and be sure to drop by our Twitch Channel if you have questions about the game. If you need something specific, check out our Baldur’s Gate 3 Wiki which is being worked on night and day, as well as our Baldur’s Gate 3 Guides.
Log in to leave a Comment