Diablo 4 Meteor Sorcerer – Lvl 70 Fire Build Guide: In this Diablo 4 Sorceress Class Build, I’ll show you how to play a Lvl 70+ Fire Sorcerer. This is a thematic build focused on keeping your gameplay fun while still giving you quick clears of content and keeping you alive. If you are looking for a really fun build to both get you from the beginning of Tier IV up to the very late game, then this Diablo 4 Fireball Mage Build guide is for you!
Diablo 4 Perfected Pyromancer Build – Meteor & Fireball
I made this build because I love the fire effects of the game and I wanted to recreate the classic D2 Fireball build where possible. The result is a really fun and interactive build that gives you a lot of active gameplay, rather than relying on one skill mindlessly. You will feel powerful, you will clear endgame content with ease, but you’ll also be engaged and put on an amazing show while doing it.
This is an advanced version of our level 50 Pyromancer Sorcerer, with some key differences based mainly around the focus of your skill allocation and the optimization of the gear you should use. The advanced paragon boards bring in extra damage and survivavility that you really need.
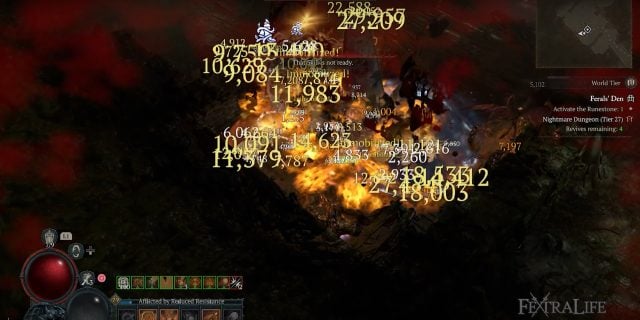
Your gameplay will be rather simple: Summon your two hydras to start a fight, round up a large group of enemies, then use meteors until your mana runs out and if there are elites use Inferno to stick them in place and rain free meteors while your mana regenerates. Get out of tough spots using Flame Shield while leaving your enemies immobilized, burning and exploding behind, then calmly blow them up some more from afar.
And if you run into fast mobs that are moving out of your meteor: use the fireball skill to quickly take them down.
The Fire Sorcerer is an excellent option for those that want to clear a room quickly and with a bang, and it also plays very well with friends, as your fireball enchantment will apply to any enemy your party is facing and create explosions even when your friends get the kills.
The build is simple to set up, and has a wide variety of options to further improve it, making it a good choice for both players that are just starting with Tier IV, and those engaged in the endgame grind.
Diablo 4 Fire Sorcerer Build LvL 70+: Skill Distribution
Once you hit Tier IV you’ll want to start thinking about min/maxing to get the most out of your build, and that starts with skills. Our skill choices are very similar to the Pyromancer level 50, with specific adjustments based on how the endgame actually plays. The most important part of skill selection is that this build, as all the builds I make, is FLEXIBLE. If you are just starting and can’t find specific gear and want to put a point into a shield, do it. You can swap it later. If you want to only put 3 points into Hydra and unlock teleport and ice armor with those points, you can do it too.
My objective was to create and demonstrate an exclusively fire sorc that was viable at this point in the game, so I have focused and redoubled on fire only, but the build will work even if you change small aspects.

And of course, keep in mind your skillpoints should also move if you don’t have all of them yet and have found equipment with the skill. For example if you’re trying to build this from the start of the game, or if you are missing reputation skillpoints, you can find a head piece with +Hydra – then you could not put extra points into hydra yet and up your meteor damage first, etc.
The skill allocation speaks for itself, you will be mostly using your hydras to nip away at enemies and lucky hit meteors, your meteors for heavy damage, and your fireball for small groups or fast moving targets. Whatever you do, don’t sleep on your Flame Shield. It’s an incredibly powerful CC breaker that we’ll take full advantage of to live through dungeons many levels above us.
Enchantments
The sorceress enchantment system is full of opportunity and can also be very tempting for opportunistic assignment. You may get a piece of gear with a free firewall that we did not put any points in, and it may slot beautifully into your build. The same can be said for Ice Armor, Frost Nova, Teleport, etc.
That said, you absolutely must put one of the enchantments as Fireball. This enchantment is very powerful and the key binding aspect behind the builds burst room-clearing capabilities. Fireball detonations on enemy death scale to the point of creating amazing chain reactions that can actually decimate multiple simultaneous groups of enemies. And it looks great.
For my second enchantment, if you want to stick to my recommendation, we’ll use Meteor. There’s an 8% chance of a meteor on a lucky hit, but it can be triggered by your 2 hydras that have fantastic attack speed, so it actually ends up being a lot more if you have invested into lucky hit where possible (you should, this is a good mechanic for the sorcerer)
Diablo 4 Perfected Pyromancer Sorc Build: Equipment, Gems and Aspects
Equipment is the most important part of any endgame build, and It’s important to understand that it’s a long term goal. You won’t have all paragon boards available right away, and getting all uniques will probably take a lot of farming, so try to use Legendary Aspects to adjust to your needs while you farm levels and better gear.
Legendary Aspects and Unique Powers
My current build is making use of zero unique items. There are some that can be used for good synergies, but in practice they can be very rare drops, bad rolls, or you may get a godtier item some other way.
As a general note, try to prioritize Mana Cost Reduction, Fire / Pyromancy / Conjuration Damage, and damage reduction from X.
Another important thing to notice is that, when looking for stats, you’ll want to make sure you are fulfilling your Paragon Rare Node requirements. Some rare nodes have very high requirements, and equipment is what allows you to fulfill them. These bonuses often double the rare node effect so, for example, getting an equipment piece with +100 Intelligence might unlock one or more node bonuses, giving you a massive bonus as a result.
Helmet
Legendary Aspect
Aspect of the Protector: Damaging an Elite enemy grants you a Barrier absorbing up to [x] damage for [10] seconds. This effect can only happen once every [30] seconds. You want to have a high roll on this to maximize the usefulness of the barrier. You will engage elites all the time and 30 seconds is a quick cooldown, plus ten seconds is usually enough to decimate an elite group.
Affixes
- +Intelligence
- +Willpower
- +Dexterity
- Life on Kill
- Maximum Life
- + Hydra (3 will become 4 for Ancestral upgrades)
- + Total Armor
Chest
Legendary Aspect
Aspect of the Unwavering: Taking direct damage has a [2-6%] chance to reset the Cooldown of one of your Defensive Skills. This is INVALUABLE for this build, as any direct damage you take may reset your Flame Shield cooldown, giving you an immunity bubble, unstoppable, and +10% damage for 4 seconds.
Affixes
- + Damage
- + Conjuration Skill Damage
- + Pyromancy Damage
- + Fire Damage
- + Stats
- + Damage Reduction from X (anything)
- + Total Armor
Gloves
Legendary Aspect
Aspect of the Three Curses: Meteor deals [X]% increased Critical Strike Damage against Healthy targets. This is a relatively situational aspect as its main impact will be the hit of your first meteor, as targets won’t be healthy for the second barrage. That said, it helps create a quicker death for weaker mobs, who will then explode for AoE damage, hopefully helping start your chain reaction of death.
Affixes
- + Critical Strike Chance
- + Fireball
- + Intelligence
- + Willpower
- + Dexterity
- + Attack Speed
- Lucky Hit Chance: Heals or Mana regeneration ones
Unique Equipment
Don’t use the Fireball Unique Gloves (Gloves of the Illuminator – Unique Effect: Fireball now bounces as it travels, exploding each time it hits the ground, but its explosion deals x% less damage) This bonus is SO bad it’s laughable. It will nerf your Fireball by a ridiculous amount, and creates an almost comical bouncing effect that is so terribly underwhelming our entire Twitch chat was rofl about super mario fireballs.
Waist
Legendary Aspect
Aspect of Disobedience: You gain [0.25-0.50]%[x] increased Armor for 4 seconds when you deal any form of damage, stacking up to [25.00-50.00]%[x]. This is essentially a big boost to your survivability, but you want to get a high roll to really make it count. You’ll be dealing damage constantly and greatly benefit from it.
Affixes
- + Meteor
- + Damage Reduction (all types)
- + Stats
Boots
Legendary Aspect
Ghostwalker Aspect: While Unstoppable and for 4 seconds after, you gain [10- 25%] increased Movement Speed and can move freely through enemies. This aspect greatly increases your movement speed everytime your flame shield pops. In addition, it will allow you to freely move through enemies, so you can use Flame Shield to break CC and this aspects will allow you to move away from the spot.
Alternatively, you can use Aspect of Binding Embers (Flame Shield lets you move unhindered through enemies. Enemies you move through while Flame Shield is active are Immobilized for [2.0-3.0] seconds. ) The immobilized can be very useful for making sure nothing chases you away from the group.
Affixes
- + Movement Speed (Only if you care about running fast, I don’t)
- + Flame Shield
- + Intelligence
- + Willpower
- + Stats
Unique Equipment (only if you’re willing to break the roleplay for some ice)
Penitent Greaves: These greaves provide a massive boost to movement speed. On top of that, its unique power leaves a trail of frost behind you, chilling enemies. Enemies that are chilled will move and attack slower, and if they stand on top of the chill for too long, they’ll freeze.
Weapon: Two-Handed Staff
Legendary Aspect
Aspect of Armageddon: A hail of Meteorites falls during Inferno, dealing [X] Fire Damage on impact. Your Meteorites Immobilize enemies for 3 seconds.
or
Aspect of Shattered Stars: Meteorites fall around Meteor, dealing [X] Fire damage on impact. Your Meteorites additionally Burn enemies they hit for [X] damage over [X] seconds.
You need both aspects for this build so decide which goes on Amulet and which goes on your Weapon based on the ones you have rolled better. Your weapon is SUPER important for your damage output so make sure to look for something that has high DPS, and good rolls to:
Affixes
- + Intelligence (You are looking to get a roll of 100+, which you will upgrade to ~170)
- + All Stats (You are looking to get a roll of 50+, which you will upgrade to ~75)
- + Core Skill Damage
- + Damage to Distant / Close Enemies depending on your preferred playstyle
Unique Equipment
Staff of Endless Rage: This is a good but not good enough unique because, despite the nice fireball bonus, the fixed stats on the staff do nothing to boost your paragon, and the DPS rolls on the unique can be rather disappointing. You can use it as a placeholder but I would always prioritize a stat-heavy rolled rare that we customize. If you do opt for this staff, you’ll have to sacrifice one synergy aspect as the weapon slot is only shared with your gloves or jewelry.
Amulet
Aspect of Armageddon: A hail of Meteorites falls during Inferno, dealing [X] Fire Damage on impact. Your Meteorites Immobilize enemies for 3 seconds.
or
Aspect of Shattered Stars: Meteorites fall around Meteor, dealing [X] Fire damage on impact. Your Meteorites additionally Burn enemies they hit for [X] damage over [X] seconds.
Affixes
- + Inner Flames Passive
- + Rank all conjuration skills
- + Rank all defensive skills
- + Pyromancy Skill Damage
First Ring
Legendary Aspect
Serpentine Aspect: You may have [X] additional Hydra active, but Hydra’s duration is reduced by [X]%. Your Hydras are going to put in great work dealing passive damage and triggering lucky hit free meteors, so to maximize the use of your resources, make sure you get a good roll on this one to benefit their duration.
Affixes
- + Damage to Burning Enemies
- + Damage
- + Fire damage
- + Critical Strike Chance
- + Resource Regeneration
- + Damage to close/distant enemies depending on your playstyle
Second Ring
Legendary Aspect
Aspect of Inner Calm: Deal [3.0-10.0]%[x] increased damage for each second you stand still, up to [30]% [x]. You want to roll 9 or 10% for this to be worth it, but this aspect adds 30% damage after 3 seconds of standing still, which is completely doable if you are managing your positioning and making good use of your barrier and Flame Shield. It will also pile onto the 10% damage increase we get after using flame shield, making your Inferno+Meteor shower combo truly deadly.
Or
Aspect of Ancient Flame: While both bonuses from the Esu’s Ferocity Key Passive are active, your Attack Speed is increased by [40-50]%. This is a more situational aspect, but you may want to use it here or on your gloves instead of Aspect of Three Curses. You can experiment with both or use the one you’ve gotten better rolls on.
Affixes
- + Damage to Burning Enemies
- + Damage
- + Fire damage
- + Critical Strike Chance
- + Fire Damage
- + Resource Regeneration
- + Damage to close/distant enemies depending on your playstyle
Gems
For gems, you’ll want to slot:
- Weapon: Amethysts to increase your Damage over Time for your burning.
- Armor: Rubies to boost your maximum life for your Barriers.
- Jewelry: Skulls to boost your defense value because resistances don’t work well and having flat armor is actually better.
Paragon and Glyphs for Endgame Fire Sorceress Build
When it comes to Paragon boards, we are mainly going to aim for rare nodes that increase our damage output, as well as glyphs that synergize with our build. Please note that the order in which I get the nodes is just a general guideline, and you can adjust it to your current needs.
First Paragon Board – Base
On the first paragon board, you’ll want to first take the rare node on the right and then head up toward the Glyph socket. We will be completely ignoring any elemental resistance nodes as they are useless when compared to the flat % damage reduction ones available further up your boards. On the glyph socket, you’ll want to slot the “Warding” glyph and eventually assign 25 willpower around it. The normal effect will boost the damage rare node above, while the bonus effect will give you extra damage reduction based on your mana. If you’re doing ok for survival, you can ignore the second bonus until you have points to spare.
Continue up through the left of the board through the non-physical damage node, grab the ones around it too, and then unlock your second board.

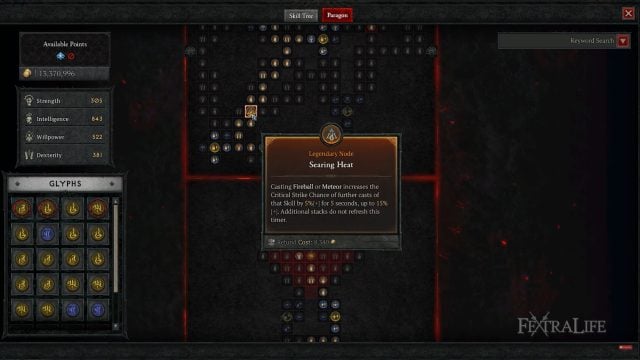
Second Paragon Board – Searing Heat
On this board you’ll want to rotate until you have the “Pyromancy” rare node on the bottom side as this will be the first node you’ll want to take before getting to the board’s legendary slot. Take the Fire Damage rare nodes then head up to the Searing Heat legendary node that increases your Fireball and Meteor critical strike chance.
From here you’ll head up and make a diversion to the left to grab the rare node “Keeper of Flames”, that reduces your damage taken from burning enemies. You will then go back a few slots and head right (the opposite way) to unlock “Combustion” and increase your fire damage and critical strike damage.
Continue upward toward the glyph slot, where we will use “Adept” to improve our mastery skill damage. You need to grab some intelligence slots around this area for it to get its full benefits, so do that before heading up toward the “Flame Touched” rare glyph that also boosts mastery and damage, and finally left toward the gate.
Third Paragon Board – Burning Instinct
You’ll want to rotate the board until you have the “Smoldering Embers” rare node and glyph slot on the bottom left side. Head straight for it and take it in combination with its damage magic nodes. From there, head upwards to the glyph slot and use “Tactician” and make sure that you add enough dexterity in range to use the glyph’s bonus, that gives you +10% damage for 4 seconds everytime you use a defensive skill. This is a great synergy for your Flame Shield, which should be coming off cooldown often, giving you very useful and consistent boosts.
From here, head left and obtain the “Cinders” slot, that increases your damage to burning enemies and your intelligence. These bonuses can be greatly boosted by upgrading Tactician!
There are now two rare nodes we want and they are in different directions. You can head to one and then to the other, and optimize your path based on what stat slots you prefer to use and whether you plan to exit to the next board through the left (like we will). Your first target is “Kindling”, which gives damage to burning enemies and, more importantly, damage vs elites! Take the other damage nodes around it as these are quite important. Your second target is “Safeguard”, which gives you damage reduction vs elites, greatly improving your survivability in high level dungeons.
Now onto the legendary node, go through “Keeper of Flames” to further improve your damage reduction vs burning enemies, then grab Burning Instinct legendary node to improve your burning damage based on your intelligence (this is why getting those big intelligence rolls on the staff can be super important!)

Fourth Paragon Board – Enchantment Master or Elementalist
These boards are not currently used on the build footage as they are beyond the level that I am at. However, this is a build meant to keep growing, so my guidance is to pick one of the two based on your preferences and feel of how your build is coming together.
Enchantment Master should be rotated to get to “Ruinous”, which gives + non-physical damage and damage to elites. The legendary bonus on this board is not very impactful, it gives you +20% enchantment effect. Taking this node would boost your fireball enchantment damage from 50% to 60%, and your chance to trigger a meteor from 8% to 10%. Not a huge change for either so you can opt out of this and continue on to another board.
The other good nodes in enchantment master are “Suffused Resilience” because it reduces the damage over time you take, and “Elementalist” because it increases your non-physical damage and 4% of your max life.
The Elemental Summoner board is next up, and it can be quite good for making your Hydras work harder for you. The legendary node here is really underwhelming, so you would rotate the board to get “Reservoir” and “Conjurer” near your gate. Reservoir gives you extra mana and 4% maximum life, while Conjurer will increase your conjuration damage and intelligence.
Another great node on this board is “Swift Conjurer” as it also increases attack speed in addition to giving more conjuration damage.
The remaining useful nodes are “Keeper of the Elements” and “Fleeting”, but they are far away and you may be better served by using points to improve socket nodes that you like.

Final Tips
Setting out to play a sorceress that’s not focused on movement speed and has no teleport is probably a strange idea for many veteran players, but it really does work. Your boots can give you many evades (I currently have four), which work quite as good as a teleport and don’t eat your resources.
Your playstyle should be focused on rounding up enemies to trigger satisfying chain reactions as the weaker ones die and take out the larger ones with them, while you calmly stand and cast.
Make sure not to overdo your movements: your mana cost reduction and damage boosts are counting on you standing still for a few seconds. So summon your hydras, drop your meteors, then inferno elites into place and shower down more deadly meteors on them from the safety of your flame shield.
If you are struggling to get aspects and gear, remember that you can gamble for sacred and ancestral gear at the curiosities vendor, and you can run legions and helltide mystery chests with the help of randoms on the server. Overall, your drops seem to improve as you level so don’t worry if ancestrals are not coming in right away.
Remember to craft and drink Precision Elixirs, which increases both critical strike chance and critical strike damage, further boosting the build performance.
This build shines when you are facing large quantities of enemies, so try to run dungeons with tight corridors and big packs.
Lastly, whatever you do, NEVER run a nightmare dungeon that has -fire damage or -burning!
Be sure to check out our Diablo 4 Wiki for any other questions you have about the game and the Builds page if you are looking for more Diablo IV Builds, as well as our Getting Started Guide and Best Class to Play if you are looking for more Diablo 4 content!
2 responses to “Diablo 4 LvL 70+ Perfected Pyromancer Sorceress Build Guide”
Fixed. There was an extra point in warmth that can go to align the elements.
This is not accurate. It shows that 58 points have been spent on the skill allocation, however, you for to include the 1 point cost of “Align the Elements” that it takes to get to the skill “protection.” This makes one of the above skills short by 1 skill point. Where would you remove that 1 skill to continue to make this build work?
Log in to leave a Comment