
Raids, an old mechanic brought to life in MMORPGs have throughout time invaded other genres of games. Raids in Destiny 2 aren’t new considering Destiny had several raids that pushed Fireteams to new heights. However, it seems there will be only one raid in Destiny 2, the “Leviathan“. Despite the game being out for over two months now, there are still guardians who have not completed the raid, whether due to time constraints, failure to find a suitable fireteam or the Guided Carry system Bungie implemented is fundamentally broken. Rejoice with me as I walk you throughout the Leviathan Raid.
Destiny 2 | Leviathan Raid Guide
Arrival
Run past the standing guards and take the left stairs up. Follow the stairs up and make a right. Go inside the room and take the warp pad up. This will drop players off near the top, make sure you don’t die due to the impact of the fall; use hover, glide, or jump to make the land safely. Bypass the standing guards and enter the Courtyard.
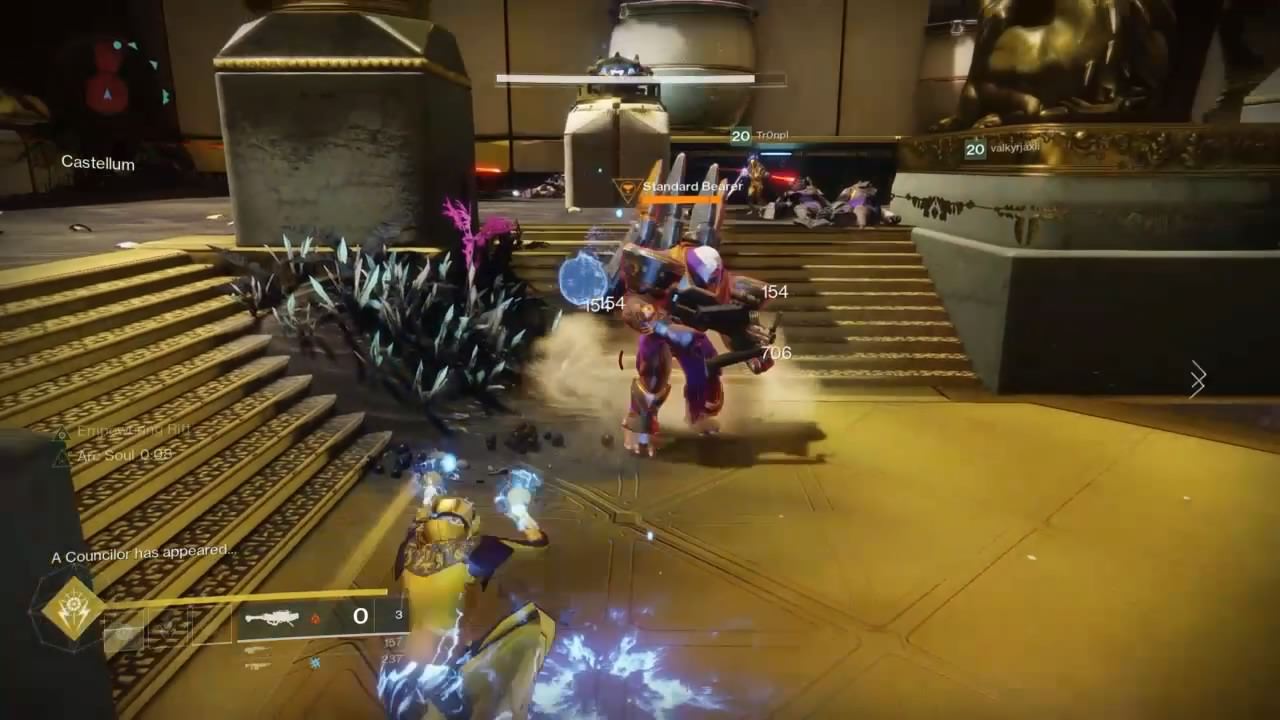
Leviathan Castellum
In the Leviathan Castellum there are four doors that will lead you to different parts of the raid. One will take you to the “Royal Pools”, another would take you to the “Pleasure Gardens”, one will take you to the “Gauntlet”, and one would take you to “Calus”.
- Sun door takes you to Royal Pools
- Chalice (Cup) door takes you to Calus
- Beast (Dog) door takes you to the Pleasure Gardens
- Halberd (Axe) door takes you to the Gauntlet
Note: Each week the encounters of the Raid will be shuffled around so bring up your ghost using the touchpad to give you a hint to where you must head to.
Team Composition
Recommended Weapons:
- Kinetic
- A scout rifle (Nameless Midnight, Mida Multi Tool, Tone Patrol)
- An auto rifle (Origin Story)
- A hand cannon (Better Devils)
- Energy
- A scout rifle (Manannan SR4 and Pleiades Corrector)
- An auto rifle(Uriel’s Gift and The Number)
- Sidearm (Last Hope only)
- Power
- Rocket Launcher (Sins of the Past, Curtain Call)
- Fusion Rifle (Main Ingredient, Merciless)
*All recommended weapons are part of the meta or personal suggestions I use/have used.
Team Layout:
2 Teams
- 4 Defenders Video
- 2 Scouts Video
Head towards the designated door of the week and players will see numerous enemies will spawn in. I suggest having four players defending this point and having two players on the hunt for a flag. At the designated door will be a silhouette of (Axe, Dog, Sun, Cup [minus the door symbol you are at]). The scout team (the two players hunting flags) will then go to the symbol that the silhouette is showing.
There they will kill enemies until an elite enemy, Standard Bearer, spawns in. Aim for his head and backpack for critical damage. (Best to play monkey in the middle). Once he is defeated head back to defending team and place the flag. Repeat this two more times. The defending team will have to survive an onslaught of enemies. Once the search team has captured 1 flag, a new enemy called a Councillor will appear.
He is enclosed in a bubble dome and can’t be shot, only melee. Defeat this enemy as quickly as possible to lower the shield on several elite enemies, Standard Liberators, that will attempt to retake your flag. After capturing three flags the door will open and it’s time to move onto the next encounter. Players will be returning to the Castellum after an encounter if players do not take the underbelly route.


Castellum Rewards:
- Shaders (only from the first capture the flag encounter)
- Powerful Engram (only from the first capture the flag encounter)
- Tokens (only from the first capture the flag encounter)
- 500 Glimmer on Normal Mode; 1000 Glimmer on Prestige Mode
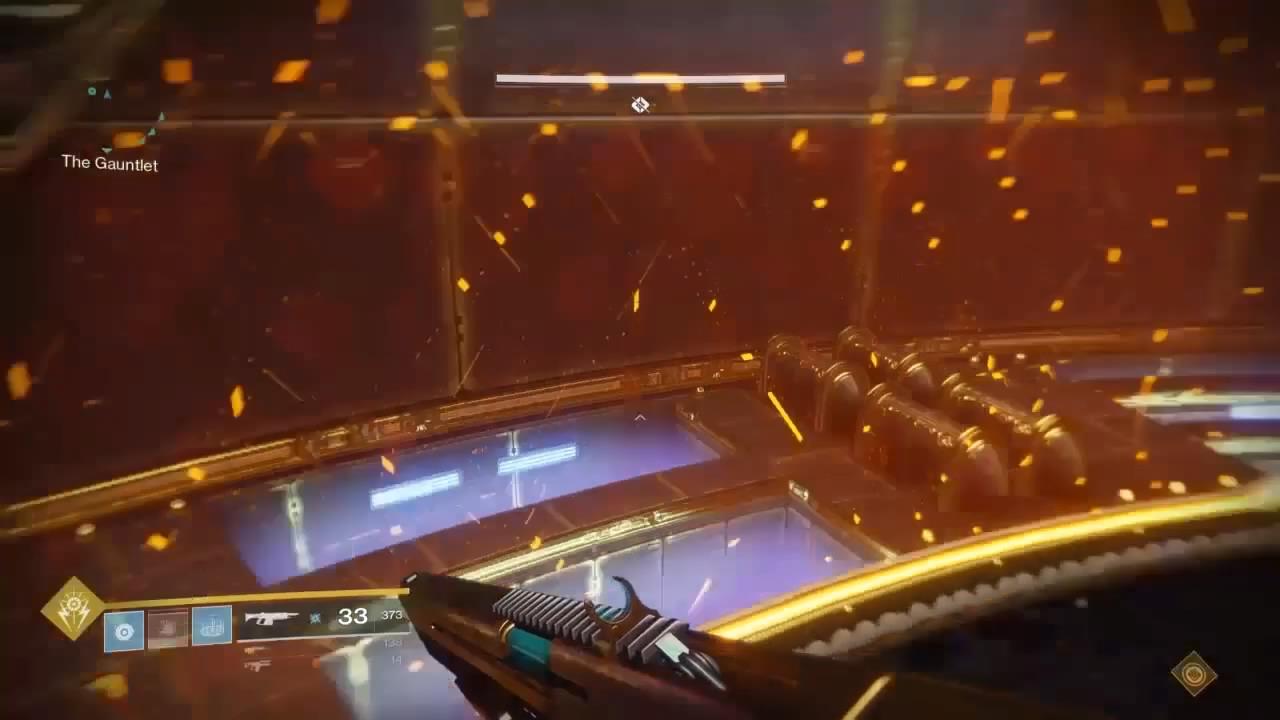
The Gauntlet


Team Composition
Recommended Weapons:
- Kinetic
- A scout rifle (Nameless Midnight, Mida Multi Tool, Tone Patrol)
- An auto rifle (Origin Story)
- A hand cannon (Better Devils)
- Energy
- A scout rifle (Manannan SR4 and Pleiades Corrector)
- An auto rifle(Uriel’s Gift and The Number)
- Sidearm (Last Hope only)
- Power
- Fusion Rifle (Main Ingredient, Merciless)
Team Layout:
- 2 Runners
- 4 Shooters
During last part of the encounter split into:
- 2 All Runners (All Runners will be the 2 players with did the running in this encounter. They will obtain an orb at each gate.)
- 2 Odd Runners (Odd Runners will obtain an orb at the first and third gates only.)
- 2 Even Runners (Even Runners will obtain an orb at second and fourth gates only)
Running the Gauntlet Video
Shooting at Dog Video
Split in two teams: two runners and four outside. One runner will be at the dog gate while the other will be on the cup gate. The four other players will pick a gate: dog, sun, cup, axe. Everyone will stand on the raised platforms to make it go down and start the encounter. There are 2 doors at each gate that will spawn enemies several times and once those enemies are defeated a elite enemy with a solar shield will be unleashed. Once the elite enemy is defeated an orb will appear at dog and cup gate which the runners will pick up at roughly the same time.
While the runners are picking up the orb, all the shooter players will now stand on the raised platform. The cup and dog outside players will shoot the topmost target while the axe and sun players will shoot the lowest target. The runners inside will see a red outlined hole (top, middle, bottom). Whichever the runners call out is the one the outside team DOES NOT shoot. Example: Sun top – outside will shoot middle and bottom at the sun gate. The runners will do this for 4 gates hopefully obtaining an orb at each gate to prolong their run until they grab a final orb st the finish line which will teleport them outside.
They will run into the middle and deposit the orb. Repeat this three times. If during the running phase the shooters mess up, the runner at that gate won’t obtain an orb and a floating Councillor will appear. He must be taken out or it will kill all players. If a runner misses 2 orbs in a row they will die. During the second run, there will be holes that the runners to avoid. During the third run, the outside platforms will rise and fall to make aiming more difficult. After the runners have done the gauntlet three times and have exited the running portion, everyone head to the center where they were depositing orbs.
Everyone will grab an orb and run the gauntlet at the same time. Players should be divided into three groups of two: 2 players to grab the orbs at the first and third gate, 2 to grab the orbs at second and fourth gate, and 2 to grab an orb at every gate. Those taking an orb at the upcoming gate should call out which one they are taking to ensure everyone grabs an orb that needs to. Avoid dying too quickly or it spells a wipe for the whole team as a person will have to run the entire length of the gauntlet, exit and run towards the fallen comrade all in under 30 seconds. If a player must die try to hold off until after the second gate as it allows to players to revive the fallen.
Rewards:
- Tokens
- Raid Weapon or Armor
Royal Pools


Team Composition
- Hunters: Nightstalker subclass is best with Orpheus Rig exotic boots and Way of The Trapper skill tree.
- Titans: Striker subclass is best with An insurmountable Skullfort and Code of the Earthshaker skill tree.
- Warlock: Stormcaller subclass is best with Eye of Another World or Crown of Tempests and Attunement of the Elements skill tree.
*All team compositions are part of the meta or personal suggestions I use/have used.
Recommended Weapons:
- Kinetic
- A scout rifle (Nameless Midnight, Mida Multi Tool, Tone Patrol)
- An auto rifle (Origin Story)
- A hand cannon (Better Devils)
- Energy
- A scout rifle (Manannan SR4 and Pleiades Corrector)
- An auto rifle(Uriel’s Gift and The Number)
- Sidearm (Last Hope only)
- Power
- Rocket Launcher (Sins of the Past, Curtain Call)
- Fusion Rifle (Main Ingredient, Merciless)
Team Layout:
2 Teams:
- 3 players on left side. 2 of them will start on a plate while 1 starts in the middle.
- 3 players on right side. 2 of them will start on a plate while 1 starts in the middle.
Starting the rotation Video
Starting on a plate Video
Split up into 2 teams of three, a left side team and a right side. Two players of each team will stand next to a plate with a floating orb. The remaining player on each team will start in the middle. All four players standing next to a plate will hop on to them while one player in the middle stands in the middle plate. If done correctly it will start the encounter; the person in the middle will relieve one member of their team, the relieved member will head to the middle to grab an orb and relieve the other person on the team. Both teams will be doing this simultaneously.
Those on plates will have a large fat enemy called a Bather who climbs up from the chain. Use your grenades and power weapon to defeat him quickly. He does massive damage so avoid getting hit even if you must get off the plate and use the nearby vent for high ground. Whoever is picking up an orb in the center should try to clear 1-2 enemies before relieving their teammate to ensure later in this encounter the teams aren’t swamped with enemies during the damage phase. Once several rotations occur, the center chain will lock and its time for all to head to the middle.
One person with an ultimate should be on the sides using it to clear the room while the other five shoot the canisters that are hanging. Those firing should focus on one until it breaks then move on. They should also look at their psionic protection, if it hits zero switch with the person who is keeping the room clear. After some time passes a Councillor will appear at the plate everyone is standing on, avoid being there when he spawns to avoid death. Everyone should head back to their original starting positions. Repeat the steps until all canisters are destroyed. On average it should take 2 damage phases to complete.
Rewards:
- Tokens
- Raid Weapon or Armor
The Pleasure Gardens


Team Composition
- Hunter: Any, but I use Nightstalker subclass with Orpheus Rig exotic boots and Way of The Trapper skill tree.
- Titan: Any, Any but I use Striker subclass is best with An insurmountable Skullfort and Code of the Earthshaker skill tree.
- Warlock: Any, but I use Stormcaller subclass is best with Eye of Another World or Crown of Tempests and Attunement of the Elements skill tree.
Recommended Weapons:
- Energy
- An auto rifle (Uriel’s Gift and The Number)
- Sidearm (Last Hope only)
- Power
- Rocket Launcher (Sins of the Past and Curtain Call)
- Fusion Rifle (Main Ingredient and Merciless)
- Sword (It Stared Back and Quickfang)
Team Layout:
2 Teams:
- 2 players using the Prisms Stones: 1 will take left side while the other does the right side
- 4 Flower hunters
- Assign a Royal Beast (dog) to each person. The spots for the dogs are L1, Trees, L3, R1, R2, R3
Left side Prism Video
Right side Prism Video
Running in the Garden Video
In this encounter, roll together in a group killing the enemies in order to maximize heavy ammo drops for the team. 2 players will then pick up a prism stone. Their goal is to stand in pillars of light and shoot a glowing flower when 4 players are next to it. There are four flower spots per side (left and right).
- Flower locations are:
- L1, L2, Trees, and L3 for the left side
- R1,R2, Caves, and R3 for the right side
1 flower from each side will light up and those with the prism stone must direct the ground team to the spot avoiding the six royal beasts (dogs) that roam the garden. Then the prism shooters should kill the Beast Handler that spawns from the doors above the garden. Once the players have 48+ stack of empowering spores everyone should head towards a dog.
Each dog will head to a fix location, there players should use grenades, power weapons, and ultimates to fall these beasts. Players don’t have to complete this task in one phase as there are four tries in normal mode and 3 in Prestige. Defeating all will allow players to head to the next encounter.
Rewards:
- Tokens
- Raid Weapon or Armor
Calus


Team Composition
- Hunter: Nightstalker subclass is best with Orpheus Rig exotic boots and Way of the Trapper skill tree. Gunslinger subclass is best with Celestial Nighthawk exotic helmet and Way of the Sharpshooter skill tree.
- Titan: Striker subclass is best with An Insurmountable Skullfort and Code of the Earthshaker skill tree.
- Warlock: Stormcaller subclass is best with Eye of Another World or Crown of Tempests and Attunement of the Elements skill tree.
- Basic suggestion would be 2 Hunters, 2 Titans, and 2 Warlocks.
Recommended Weapons:
- Kinetic
- A scout rifle (Nameless Midnight, Mida Multi Tool)
- A hand cannon (Better Devils)
- Energy
- Coldheart
- A scout rifle (Manannan SR4 and Pleiades Corrector)
- An auto rifle (Uriel’s Gift and The Number)
- Power
- Rocket Launcher (Sins of the Past, Curtain Call)
Team Layout:
2 Teams:
- 3 players inside Shadow Realm
- 3 Players inside Throne Room
Shadow Realm Video
Throne Room Video
First off, split into into 2 groups of 3, an inside team and an outside team. Starting the encounter, 2 members of the inside team will be using their Ultimates on each side. (one member using their ultimate on left and one member using their ultimate on the right) One person should toss a grenade in the middle door. After players have defeated the enemies that are spawned in, everyone will be teleported to the shadow realm once Calus claps. The outside team will take an orb and be sent back to the throne room. Make sure the outside team knows which orb they should be picking up, there’s one for each person located in the left, middle, and right side.
Each person of the inside team should see a symbol on shadow Calus’ forehead. Inside team should call out from left to right while shooting bubble Councillors in the air and Psions on the ground. The Psions will shoot players upward so either avoid the blast or kill them quickly to prevent this. The outside team will melee the bubble Councillor that was not called out. This repeats two more times. At the end, the inside team will group up together and shoot skulls that come out of shadow Calus’ mouth to obtain a high damage multiplier.
The outside team should pop two ultimates to clear the enemies in the throne room. Once Calus brings his arms in the air, drop a healing rift in the center and drop Calus’ shield 2/3rd of the way to give the inside team more time to raise the multiplier. Don’t wait to long or its a wipe. Drop the shield, and the inside team will grab an orb to take them outside. When everyone is outside hop on a platform to be able to deal damage to Calus.
I personally take the Axes, Cup, Sun, and Dogs plate route during this damage phase but any route works. However, only activate one plate at a time so have the fireteam in agreement on the route to be taken. Whenever Calus raises his hand, hop off the platform and head towards the next one and repeat. If he isn’t defeated in 1 phase then you must try again. Do everything like before, only thing that changes is that there are now holes that the inside team must avoid.
Tip: Try not to leave Calus’ lifepool under 33% to avoid him leaving large lava pools area of effects (AOEs) for those in the Throne Room.
Rewards:
- Tokens
- *330 Raid Weapon or Armor
*330 Weapon or Armor is now guaranteed since the release of the “Curse of Osiris” DLC.
Complete Raid Run
Destiny 2 is now available on PlayStation 4, Xbox One and PC.
Feature Image Credit: Nvalkyrja
Be sure to check out her other works on Twitter.
You can also check out our review on Destiny 2 to see how it stacks up to the original.
As well as our guide on locating ALL of the game’s Exotic Armors and Weapons!
Visit the Destiny 2 wiki and the complete Destiny 2 Trophy Guide
More Gaming Guides
1 response to “Destiny 2 – ‘Leviathan’ Raid Guide”
Boooo! This guy is getting carried all the time xD
Log in to leave a Comment