In this Kingdoms of Amalur Re-Reckoning Guide I’ll be providing you with some very helpful tips that will get you off to a good start in this remaster of a very underrated RPG. Kingdoms of Amalur can be a bit overwhelming when you first begin, and a large part of that is because the game is enormous, but also because the UI isn’t the most intuitive I’ve ever seen. And, while the game does a very good job of introducing you to most of its mechanics, there is simply a lot you find out the hard way. In this Guide, I’m going to attempt to save you some of that “hard way”, because I’ve already gone through it for you!
Kingdoms of Amalur Re-Reckoning Getting Started Tips: Things I Wish I Knew Before I Played
Character Creation is probably the best place to begin with any other game, because that’s what you do first, however I’m going to start off here with Skills. KoA doesn’t really explain what each does very well when you first make your character, and this can lead you to make a hasty decision that may or may not be what you actually wanted. So let’s get into those and see just what each does and why you might or might not take them.
Kingdoms of Amalur Re-Reckoning Skills & Which to Take
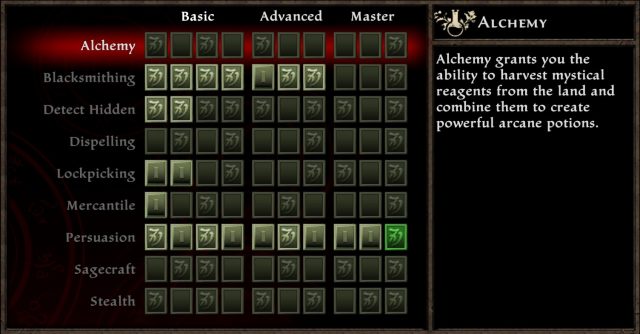
There are 9 Skills in Kingdoms Of Amalur Re-Reckoning, and since the level cap is 40, you should be able to max out 4 of them by game’s end. However, you can also train Skills at certain NPCs, as well as gain boosts from your Race at the beginning, so you should be able to get far more than 4 if you pay attention. Always buy Training when you have extra money, it’s a great investment.
Each Skill does something passively with each point spent, but also sometimes provides a new benefit when you reach each “Milestone”. Milestones are like a permanent bonus you gain that is a bit better than what you would normal get for investing into a Skill. For example, when placing points into Lockpicking, you will always decrease the difficulty of each lock with every point you spend. However, once you reach the first Milestone you will be able to force Easy locks 100% of the time. You want to have a look at these Milestones when deciding how many points you want to spend where, but the best Milestones are generally at the end of each Skill Line.
Alchemy
Alchemy allows you to craft Potions that you can use for temporary benefits, or for healing or mana. Each point you spend in Alchemy will increase the chance of you finding Reagents when harvesting plants on the landscape, which starts out as rather low by default. As you gain Milestones in this Skill you will be able to combine more and more ingredients to make more complex Potions. Note that you must experiment with Ingredients to figure out what they do, much like Skyrim. You can use the Wiki for a list of Recipes so that you don’t waste ingredients, and this will also save you points into this Skill which might be placed elsewhere.
Blacksmithing
Blacksmithing allows you to Craft Weapons and Armor for your own personal use, as well as salvage materials from existing equipment. Each point spent into Blacksmithing improves the effectiveness of Repair Kits, which are Consumables that can restore the Durability of your equipment while out on the landscape. Milestones in this Skill Line allow you to salvage materials from higher quality equipment, as well as Craft better gear. Crafted equipment is some of the best in the game, and you customize them with the effects that you want if you have the right materials.

Detect Hidden
Detect Hidden allows you to see and locate many things on your screen and mini-map that you wouldn’t otherwise. Every point invested increases the amount of Gold you find around the world, such as when looting chests and enemies. Milestones for this Skill reveal more and more things like Traps, Secret Doors, Lore Stones and Treasures. This is an excellent Skill to take if you find you are having difficulty with Traps, or you just don’t want to miss out on anything that Amalur has to offer in the content department.
Dispelling
This Skill makes it easier to Dispel Wards on Chests that would otherwise kill or curse you when trying to open them. Each point invested makes it easier to accomplish this, and Milestones in this Skill Line allow you multiple failures before you can try again, as well as do other things to make it easier for you to Dispel. Depending on your reflexes you may or may not need to invest a ton of points here, but I strongly advise saving before trying more challenging Wards because they are no joke. And, I highly recommend not trying to Dispel Wards that are too difficult for you until you’ve invested some points here. You shouldn’t have to do this immediately, but if you find yourself struggling at some point then you may want to start investing in this Skill.
Lockpicking
Lockpicking allows you to open locked chests more easily in Amalur, but it doesn’t prevent you from trying to open them if you don’t have Skill Points here. Each point invested makes it easier to pick locks, and each Milestone allows you to force more and more difficult locks with 100% success, saving you the time of having to do them yourself. While it is possible to open any chest in the game if you have enough Picks (regardless of your Lockpicking rank), you will burn through a ton of them if you don’t invest at least some points here. You don’t need to do this early on, but much like Dispelling, if you find you are no longer able to open chests without trouble then start investing here.

Mercantile
This skill allows you to buy more cheaply and sell items at a higher price. Each point invested improves the rates you receive when doing these activities, and the Milestones in this Skill Line allow you to obtain some gold when you destroy items. Inventory management can be a pain in the ass in Amalur, and without planning your excursions well you might find that you destroy items quite often, so this is not a bad choice of Skill. However, Gold is a farmable commodity in Amalur, and if you’re a bit organized you shouldn’t need to destroy things that often, so there are better Skills to take.
Persuasion
Persuasion allows you to talk NPCs into certain outcomes that otherwise wouldn’t be possible. Persuasion works on a % chance to Persuade, and the higher chance you have, the more likely you are to succeed. You can never hit higher than 95%, and if you find that you are at 95% the whole game then you have placed too many points here, and likely could have done with less, spending points elsewhere. Additionally, you can savescum conversations for the outcome that you want, so it isn’t entirely necessary to have even close to 95% to get what you want done. Only invest points here if your Persuade chance is very low, or if you don’t savescum.
Sagecraft
Some Weapons and Armor in Amalur allow you to socket Gems into them for enhanced effects. Sagecraft allows you to Craft these Gems, giving you the freedom to get the exact Gems you want for the Build you are going for. Each point invested improves the chances of getting higher quality materials to make Gems with, and the Milestones allow you to make more powerful Gems, as well as remove Gems that have already been slotted. If you’re a min/maxer then this is a must have Skill.
Stealth
Stealth allows you to sneak up on NPCs and enemies, or steal things without being detected. Every character can Stealth by default, but how well you do it is based on how many points you spend here. Each point invested increases the time it takes for enemies and NPCs to detect you, and Milestones further reduce the sight range that NPCs can see you in. While it is possible to get Stealth kills with this Skill, it is much more effective for Stealing and Pickpocketing than it is for killing (at least early game). For this reason, I don’t recommend taking this one unless you plan to Steal or Pickpocket all the time. Remember that your odds improve as the eye of the NPC begins to empty, and it will reach 0% if it is completely empty for a few seconds, no matter how good your Stealth is.
Classes, Abilities & Destinies
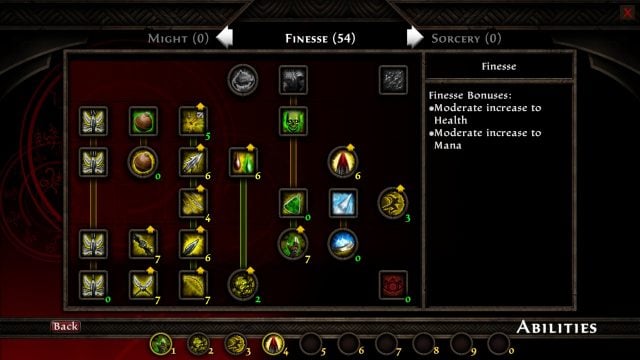
Now that we’ve gotten Skills out of the way, in this section I’d like to take a look at Classes and how you make a Build in Kingdoms of Amalur: Re-Reckoning. First let’s have a look at the Ability Trees, because this is really what determines your Build.
Abilities
In Kingdoms of Amalur: Re-Reckoning you can places points into any of the three Ability Trees each time you level up: Might, Finesse or Sorcery. There is no limitation on the combination of points, other than the game’s level cap (40), so feel free to place points how you want and experiment. Maybe you want to play a pure Rogue or a hybrid Disciple; the choice is up to you. I’ll be creating Guides for each archetype, so if you’d like more in depth information about these be sure to look out for those.
Destinies
Each time you level up in Amalur you’ll be prompted to select a Destiny. Usually, you will remain with the Destiny you currently have, since Destinies have a requirement of Ability Points spent before you can change them, but sometimes you get to move up to a stronger Destiny.
Destinies are essentially the name of your Class, or the archetype that it most closely resembles. For example, the first Destiny in Might is called Brawler. It gives you bonuses to Melee Damage and Block Efficacy. However, once you’ve spent 11 points into Might you can upgrade this Destiny to Fighter, which provides even stronger passive benefits in a similar vein. As you progress the game these bonuses will continue to get better and better no matter what route you choose.

Each Destiny is listed in the Destinies tab, which allows you to see not only what they do, but how many points you need to spend where in order to unlock them. This allows you to plan ahead, so that you can eventually reach the Destiny that is best suited for your style of play.
You can change your Destiny at any time in the Destinies tab, as long as you meet the requirements of the Destiny you are selecting. If you decide you want to try a different style of play, you need to seek out a Fateweaver and pay him/her gold and you will refund all your Skill Points and Ability Points. This will allow you to try combinations as long as they have the gold. Just keep in mind the cost to reset increases not only with each level up you obtain, but also doubles every time you do it. For this reason it is best to play around with Builds early in the game until you find your preferred style of play, while your level is still low.
Final Tips
Make sure to Salvage some of the items you don’t need, and don’t just sell them all. This will provide you with valuable Crafting Materials that you can use to make better Weapons and Armor as long as you have some points into Blacksmithing. You should have plenty of gold if you sell half or less of what you pick up, so this shouldn’t be hard to do.
Generally speaking there is no real reason to bum rush one skill as quickly as you can since you likely won’t see much benefit from it (unless it’s Blacksmithing or Detect Hidden). Try to spread your Skill points around early on so that you can do a bunch of things and focus in on 2 or 3 Skills later on. Aim for the Milestones you want, and then break off into other Skills.
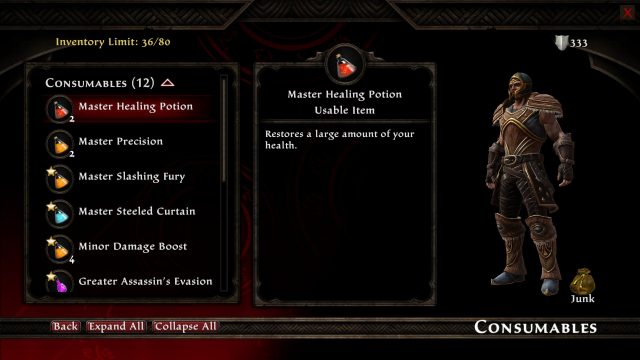
Remember to buy Health Potions whenever you can. You will pop them like candy on the higher difficulties of the game, and you don’t want to find yourself at the tail end of some really long Dungeon facing a Boss with no Potions. You cannot Fast Travel from inside Dungeons, so you’ll lose a lot of time running all the way out, Fast Traveling and then running all the way back. Stay stocked up on these and buy them or make them as often as you can.
One thing I learned relatively recently is that Burning, Freezing and Shocking, which are damage over time effects related to their elements, can actually do other things as well. For instance Burning damage can cause “Panicked”, which makes enemies run around on fire. Freezing can slow a target down, allowing you to dodge and hit them more easily. And Shocking can spread to other nearby enemies, dealing damage to them, and possibly interrupting and staggering them as well. Keep these things in mind when making your Build.
Lastly, inventory management can be a huge pain in the ass in this game, so be sure you get your House in Webwood as quickly as you can. This will allow you to store up to 200 items in the chest there, which can make life so much easier for you. To do this you need to travel there and complete The Tangled Web quest, and then you’ll have access to the house. Also, be sure to buy Backpacks when you see them because this will allow you to carry more stuff on you, which helps tremendously!
Stay tuned for more Kingdoms of Amalur: Re-Reckoning content as we explore what sort of Builds you can make in this high fantasy action RPG Remastered. And if you need help or have questions about the game, be sure to stop by our Twitch channel and ask, or check out our Kingdoms of Amalur: Re-Reckoning Wiki!
Log in to leave a Comment