In this Diablo 2 Resurrected Beginner Starting Guide I’ll be giving some general tips that will help you find your feet. This Guide is intended for newcomers, and also for those playing the upcoming Beta, so if you haven’t played Diablo 2 before this Guide is for you.
Diablo 2 Resurrected Beginner Guide & Tips (Skills, Stats, Stash & More)
There are many important aspects to Diablo 2, but perhaps none quite so much as your Skills. Let’s begin with some generally good advice about them, before we get into some general advice about other aspects of Diablo 2.

Skills
How to Get Skills
Skills are the main way to deal damage to enemies in Diablo 2 . All classes start the game without any Skills, but some of them have starting Weapons that provide an individual skill while equipped.
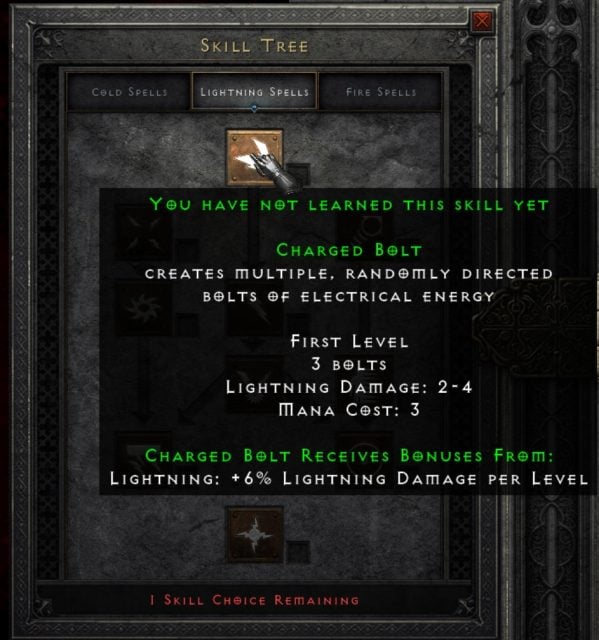
You acquire 1 Skill Point each time you level up, which can be used to unlock or upgrade Skills. To do so, open the skill menu (T for PC) and then click on the skill that you want to unlock or upgrade. Each class has 3 different trees to select from, and while you can spend skill points on all of them I suggest that you stick to a single tree during your first hours of gameplay.
Assigning and Using Your Skills
Once you have unlocked a skill, you can assign it to your normal or secondary attack button (which is different for KB&M or Controller).
For PC
For example, let’s suppose you are playing as a Sorceress and unlock the Ice Bolt skill. You can click on the secondary attack button on the bottom of the screen and then select the Ice Bolt Skill. Now, each time you press the right click button you’ll cast that spell.

You can do the same thing for the left click, but since this is also your movement key it will only work when you click on an enemy. A very handy trick here is that you can press and hold the left shift button and then press left click. This will restrict your movement, making you attack from your current position. This works both for spells and normal attacks so if you are using a bow it will make your life a lot easier.
You can also assign shortcuts to quickly swap between different spells during battle. To do so, mouse over the skill that you want to place a shortcut on and then press the desired button. These are F1 to F8 by default on PC but you can customize them from the options menu on the “controls” tab.
If you’re playing on Controller you simply need to go to the Skills tab, select the Skill you want to map, and then press the button you want to map it to. You can map up to 12 Skills in Diablo 2 Resurrected, and I advise not mapping anything to the “A” button on Xbox, or “X” button on Playstation as this is also the interact button and can make you accidentally use Skills when picking up loot.
Respec Your Character
You’ll gain 1 respec for your character after completing the very first quest of the game called Den of Evil. To use the respect, talk to Akara at the Rogue Encampment and select the “Reset Stat/Skill Points” option.

Note that this is the only respect that you’ll get during early gameplay and the only one available for the beta. So make sure to save it for at least a couple of levels so you can try a couple of different skills.
Stats
You’ll also get 5 stats points to distribute each time you level up. There are 4 different Stats in Diablo 2, Strength, Dexterity, Vitality and Energy. To assign your attribute points press “A” and then click on the + button next to the stat you want to increase.

- Strength: Most equipment pieces have strength requirements, so I highly recommend assigning some points here even if you are playing as a mage. Strength also slightly increase your melee damage, but the effect is very small.
- Vitality: Vitality determines both your health and stamina. Once you’ve assigned some points into strength this should be your second priority, as it increases your survival chances against powerful enemies.
- Dexterity: Some equipment pieces may also have Dexterity requirements, but these are mainly spears and bows. If you plan on using a bow you should definitively spend some points here. Dexterity also determines your attack rating, which is essentially the chance you have to strike an enemy. If you are playing a melee build and feel like you are constantly missing your hits, spending a couple of points in dexterity will fix the issue.
- Energy: Energy increases your total mana, which is used to cast spells, but I don’t recommend assigning too many points here as the previous mentioned stats are more important.
Inventory, Stash and Tomes
Different to most modern games, Diablo 2 has a gird inventory system where each item takes a different amount of space depending on its size. Note that this only applies to items in your inventory, and not equipped ones, as these will always use 1 equipment slot no matter their size.

To manage your inventory, open it by pressing “I”, then simply click on the item you want to move and then click on the place where you want to place it. To drop an item to the ground click on the desired item and then click outside of your inventory.
On controller you can auto sort y0ur inventory by holding R3, and you can drop items by dragging them outside of your inventory grid and by pressing “X” on Xbox, or “Square” on Playstation.
Merchants & Scrolls
You can sell items to merchants to acquire gold. To do this, simply drag the items you want to sell to the Merchant’s inventory.

Gold can be used to purchase items from merchants or to repair your equipment. I strongly suggest that you buy a Tome of Town Portal and a Tome of Identify as soon as you can afford it from Akara in the Rogue’s Encampment. This will allow you to store up to 20 portal scrolls and 20 Identify scrolls respectively.
Town Portal scrolls can be used to open a portal back to town from any given place. To open a portal, simply open your inventory and right click on the Scroll of Town Portal or the Tome of Town Portal, or hold “A” on Xbox or “X” on Playstation. This can also be assigned to a shortcut the same way as you do with skills.

Scrolls of Identify allow you to see Magical Item properties. You won’t be able to equip magic items unless you identify them first, so having Scrolls of Identify is always recommended. Additionally, Identified Items sell for much higher prices than unidentified ones, so make sure to identify your items before selling them.

Keep in mind that not too far into the game you will gain access to an NPC that can identify all your items for free from that point forward, but it’s still a good idea to keep Scrolls on you for identifying while out in the field.
Potions
Potions are the main way to recover your life and mana. Healing Potions will keep you alive, while mana potions will allow you to keep spamming spells.

Most potions will recover your resources over a short period of time, meaning that you’ll most likely want to drink a health potion when your health is around 50% instead of waiting for it to drop to more dangerous levels.
The easiest way to drink a potion is to assign it to your belt shortcuts which are located at the bottom of the screen. Belt shortcuts are assigned to keys 1 to 4 by default, but you can customize this from the in game menu. To equip potions into your belt, simply open your inventory and drag and drop the potions there.
Equipping a belt will increase the amount of potion slots, which allows you to endure longer fights. This will help you a lot early on, so if you don’t stumble across a belt, make sure you visit a merchant to get one.
Stash
You can find a Stash in town that allows you to store both items and gold. Stashed Items are shared between all character’s on your account, meaning that if you find an item that is not useful for your current character, you can stash it away and then access it from your other character. You can also save Items for your friends or that might be useful later on, like gems and runes.

You’ll lose some gold each time you die, but keeping it In your stash will prevent this in single-player mode. For this reason, it’s best to transfer your gold to the stash each time you visit town. Stashed gold can be used on merchants, so you won’t need to retrieve it each time you want to buy something.
Exploring the Map and Waypoints
Most Locations are big in Diablo 2, and for this reason, it’s easy to become lost or to define where you need to go next. There are roads during most parts of Act I. You can follow these roads if you are lost, as they will usually lead you to your next objective.
Waypoints
In multiplayer, the map will be randomized each time you join a new game. Most locations have a special teleporter called “waypoint” that you can unlock by simply interacting. Waypoint unlocks are permanent, which makes them kind of “checkpoints” between the different locations of an Act, allowing you to resume the story from where you left it.

Stamina
Running around the map consumes Stamina, which is shown as a yellow bar on the bottom of the screen. Once you run out of stamina your character will be forced to walk until you recovered, which can be very frustrating, especially during early gameplay when your stamina pool is very low.
There are two ways to get past this, the first one is by walking when your stamina is low. Walking will recover your stamina, but at a slower rate. You can toggle the run/walk mode by pressing “R” on PC.
The second way to overcome this is by consuming a Stamina Potion. They are very cheap and can be purchased from any potion merchant (Akara in Act I). Drinking a Stamina potion will not only recover all your stamina, but will also give you unlimited stamina for 30 seconds. I strongly recommend that you buy and hold several of these in your inventory during Act I.
Dying and Retrieving your Corpse
When you die you’ll respawn at town without any kind of equipment. To recover your equipment you’ll need to walk back to the place where you died and interact with your corpse. This is often a very difficult task, as you might die in a very remote location or be surrounded by enemies. Defeating those enemies without your equipment can quickly become an impossible task.

When this happens, the easiest way to retrieve your corpse is by simply getting out of the current game and creating a new one. When you spawn you’ll find your corpse in town right next to you. This will save you a lot of time and frustration, with the only downside of losing the progress that you made on that particular run.
Equipment
Enemies will constantly drop loot when you defeat them and, at first, it might be a little difficult to determine what you should pick up or not. You can see all items dropped in the ground by holding the left “alt” button.
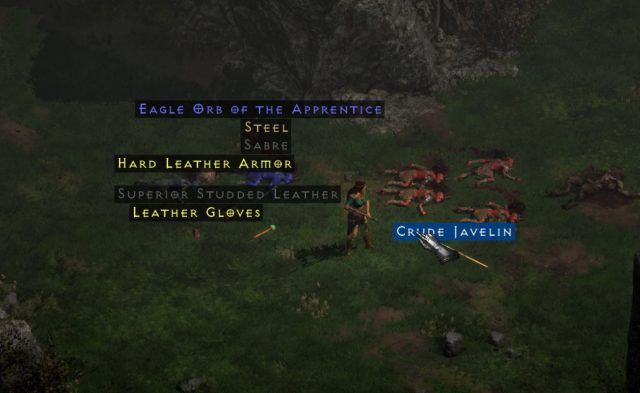
There are 6 types of rarities in Diablo 2 and they can be differentiated by color. These rarities are: Normal, Magical, Rare, Crafted, Set and Unique.
- Normal Items (white): Won’t have any kind of stats and are only useful as Bases during end-game, but since this is a beginners guide I’ll just recommend that you pass on them for the time being.
- Magical Items (blue): Have 1 or 2 random additional stats but they are not usually worth picking up since all other categories are better.
- Rare Items (yellow): Can have from 2 to 6 random additional stats and are usually worth picking up and identifying to check if they are worth keeping or not.
- Unique Items (gold): Have unique names, images and attributes. Their attributes are fixed, but they usually range between different levels for example +20 to +30 Strength. These Items are almost always worth picking up and can have unique stats that can only be present on them.
- Set Items (green): Similar to Uniques, set items have unique names, images and attributes. They don’t have unique stats on their own, but will provide them when many pieces of the same set are equipped. It’s difficult to find all set pieces on your own, but you might be able to get them through trade or borrow them from a friend.
- Socked Items (gray): You can insert Gems, Jewels and Runes into these items and they’ll acquire those item properties. Runes are special items that can be combined to create powerful and unique equipment. You can visit our wiki for more details on Runes and Runewords.
Elite and Unique Enemies have a much higher chance to drop higher rarity items, so its always a good idea to defeat these packs. Elite and Unique monsters usually have distinctive colors, but can also be recognized by their names.
Mercenaries
Mercenaries are companions controlled by the computer that will aid you in combat. While they are not very strong, they do help in battle by dealing damage and luring enemies away from you.
You’ll get your first Mercenary after completing the second mission of the game, called Sisters’ Burial Ground. Each Act features a different type of Mercenary. If your mercenary dies in battle you can resurrect them at any time by simply talking to the mercenary leader of the town (Kashya in Act I)

You can give Mercenaries equipment by pressing the “O” key. The weapons that they can use are tied to their class, for example, Act I mercenaries will only be able to use bows. Note that your mercenary will also need to meet the requirements of the item you are trying to equip on them.
You can see your Mercenaries’ health on the top left part of the screen. If their health drops, you can give them a healing potion. To do so, press and hold shift and then right-click on the desired potion or its designated hotkey.
Act 2 mercenaries are widely considered to be the best ones, because they can provide you with Paladin Aura buffs. I strongly recommend that you hire one as soon as you reach Act 2 by talking to Greiz in the north-east part of town.
Stay tuned for more Diablo 2 Guides as we get closer to the launch of the game on September 23rd, and be sure to check out the Diablo 2 Wiki for any questions you might have about the game!
Log in to leave a Comment