
Okie-day. We just got done talking about extract brewing and the general brewing steps. Extract brewing, if you remember, involves using malt that is extracted from barley. The up side is convenience. It is a long process to extract the malt from barley. The down side is you have less control, the beer is generally darker, and there can be a slight “tang” to the beer.
All grain brewing is much more complicated. And, as such, we’ll tackle it in two articles. The first article will be about equipment. You’ll need to invest in several pieces of equipment to be able to do this. The second article will be about the process. The process has many steps, so it deserves an article of its own.
The first piece of equipment you’ll need is called a mash tun. For the novice home brewer, it is usually a large cooler, such as an Igloo cooler or a Coleman rectangle one. It is usually 7-10 gallons or more in size. The larger the cooler, the more barley you can fit inside, and the stronger the beer you can make. This tun is where the magic takes place. We’ll discuss that magic later on.
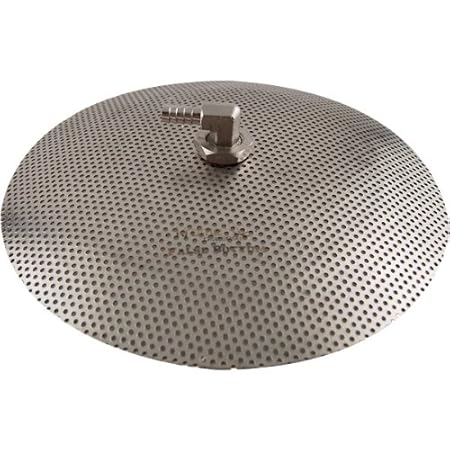
Once you get the cooler, you’ll need to modify it. You’ll need a filter so you can drain the malt from it yet keep the barley inside. The type of filter varies based on the type of mash tun you have. An Igloo cooler needs a “false bottom”. This is a circular sturdy wire mesh the same diameter as the cooler Stainless Steel False Bottom for Homebrew Pot: 10″![]() . It fits down at the bottom, just above the exit valve. The rectangular cooler simply has a wire mesh in the shape of a tube on the inside, connecting to the exit valve (one example is called a “bazooka screen” 12″ Boil Screen
. It fits down at the bottom, just above the exit valve. The rectangular cooler simply has a wire mesh in the shape of a tube on the inside, connecting to the exit valve (one example is called a “bazooka screen” 12″ Boil Screen![]() ).
).
You’ll need a ball-valve spigot as well. This goes in place of the exit hole of the coolers. You’ll have to remove the cap, and install the spigot. Don’t worry, the spigots are made to fit exactly into the coolers. Buy it here![]()
Once completed, it’ll look something like this: 
![]()
In order to do this process, you’ll need a lot of water. Sometimes over 10 gallons total. In order to deal with this much water, you’ll need to have a much larger boiling tank (instead of your puny pot you used for extract brewing). You’ll be boiling over 7 gallons for your 5 gallon batch. So, ideally, you’ll want a tank that is over 10 gallons. I, personally, use one of the old Anheuser-Busch 15 gallon kegs. And, naturally, you’ll need to add another ball-valve to the kettle. It is also nice to have a thermometer installed into it as well. Here’s an example of a high end boiling kettle.
![]()
Now, you’ll need to be able to cool 5.5 gallons of wort (once you cool it, drain it, and ferment, you’ll lose roughly 0.5 gallons). It takes a bloody long time to do this without help. There are many ways to do this, but the most common way is to use a wort chiller. There are two types, “immersion” and “counter flow”. An immersion chiller is less expensive, but takes longer to cool. A counter flow chiller is much more expensive, but cools very quickly.
An immersion chiller is a coiled copper or stainless steel tube, 25′ in length. You run cold water through it and place it into your kettle. The cold water sucks the heat from the wort, chilling it. It can take 15-30 minutes to cool the wort. 
![]()
The other type, counter flow, is similar to an instant water heater. You run the wort past cold water, as you drain it. This works instantaneously, but is more costly. Convoluted Counter-flow Wort Chiller![]()
Basically, it is a tube within a tube.
Odds and ends. There are many different small pieces of equipment that you need or are nice to have. Tubing, thermometers, mash paddle (for stirring the barley in water), siphons, scales, barley crusher, timer, etc. You can find starter kits with the majority of what you need such as this one, from my favorite store:
In the next article, I’ll go over the entire process and how it all fits together. I can usually make get a batch into a fermenter in 5-6 hours, including cleanup. So, it is an all day procedure.
Later everyone.
One response to “Home Brewing: All Grain, part 1 – Equipment”
Forgot one important part . . . a propane burner. No way in hell can you boil 7 gallons of water on a stove top. I’ll have to remember to include it in part 2.